


Motion Mode
The Motion mode allows to extract a motion from a Maya joint hierarchy, convert it into Golaem Crowd's internal motion representation, edit it and save it. The edited file is a Golaem Motion file (*.gmo). Motion files are used to play motions in the Motion and Locomotion Behaviors. It contains:
- the source skeleton representation
- bone animations for each frame
- blend shape animations for each frame
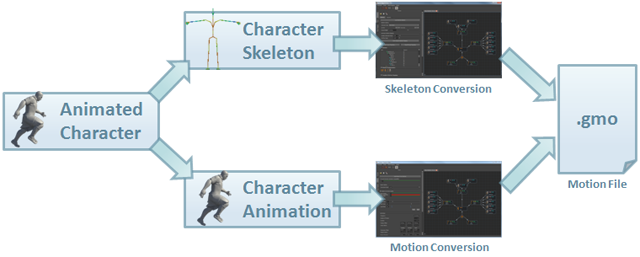
Motion File Workflow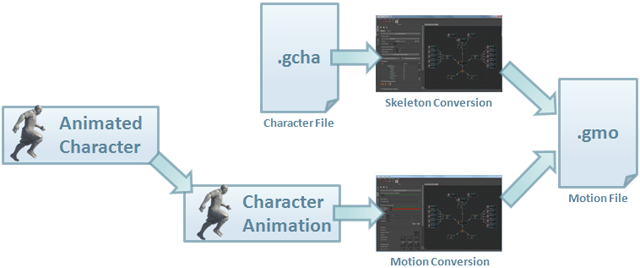
Other Motion File Workflow (if the Animated Character Skeleton has already been exported for Golaem Crowd.
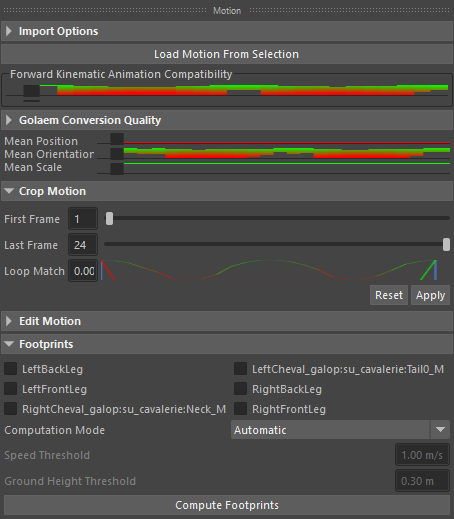
Side panel in Motion mode
The information shown in the side panel is relative to the the active tab of the Main Workspace. To start using the side panel in this mode you have to either load a motion file or load a motion from a Maya joint hierarchy (see below).
Loading a Motion from Selection
You can access this feature through:
- Side panel: Load Motion From Selection button
This command needs a valid Skeleton Mapping in the Character Maker (either loaded from a Character File, computed automatically from a Maya joint hierarchy, or created manually). It loads the motion of the Maya joint hierarchy under the selected Maya node. The Maya joint hierarchy on which the Skeleton Mapping is based must be identical to the selected Maya joint hierarchy.
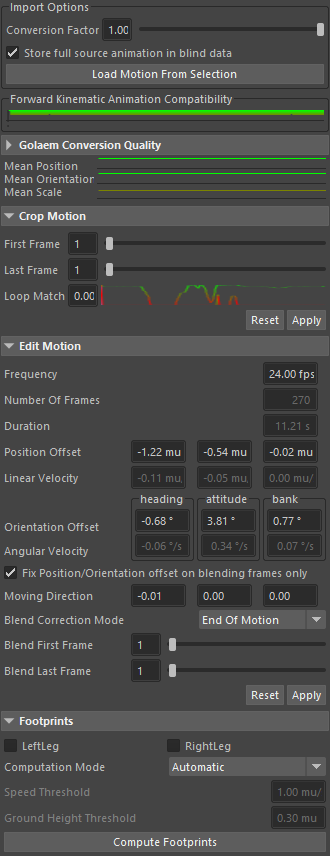
Import Options
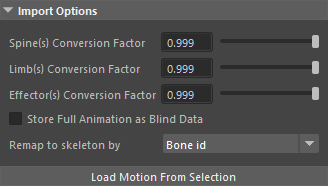
Import Options
The following options are available when loading a motion from the a Maya joint hierarchy:
| Conversion Factor for Spines, Limbs, Effectors |
This parameter determines how to compute the plane and the direction in which a bone chain bends in a motion. If set to 1, the bone chain will bend in the same direction and on the same plane as the bend in the motion. When set to 0, the bone chain will bend according to the IK normal plane of the Skeleton Mapping (see image below). Any value between 0 and 1 results in a blend between the two extremes. In most cases the default value (1) will suffice and should be used. If you experience artifacts with this value, like inverted IK - which is especially visible in a crowd simulation that uses Render Previz, lower the conversion factor until the problem is solved. The conversion factor can be set to different values for Spines, Limbs and Effectors. |
| Store full source animation |
This option allows to store more information in the animation file. Along with the Golaem animation format (only Golaem nodes described in the .gcha file), it will also store the rotation and translation of every bone in the skeleton in blind data. See here for more information about this process. |
| Remap to skeleton |
This parameter allows to specify wether the animation bones should be remapped on the source skeleton by ID (should be the case when the skeleton in the .Gcha is the same as in the animation) or by name (might be the case when the skeleton had slights modifications that changes the order of the bones in Maya and thus in Golaem). You should try the 'remap by name' option only if the remap by ID option produces animation that does not look even slightly similar to the original one. |

Motion Conversion Factor set to 0 (left) or to 1 (right)
When a motion is loaded, a progress dialog will be displayed (see image below). If the motion conversion fails, a popup will be displayed and an error message will be displayed in the Script Editor.
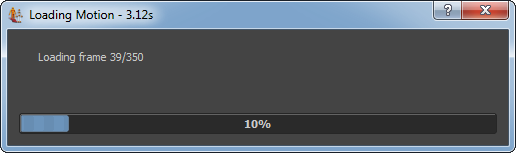
Loading Motion Progress Dialog
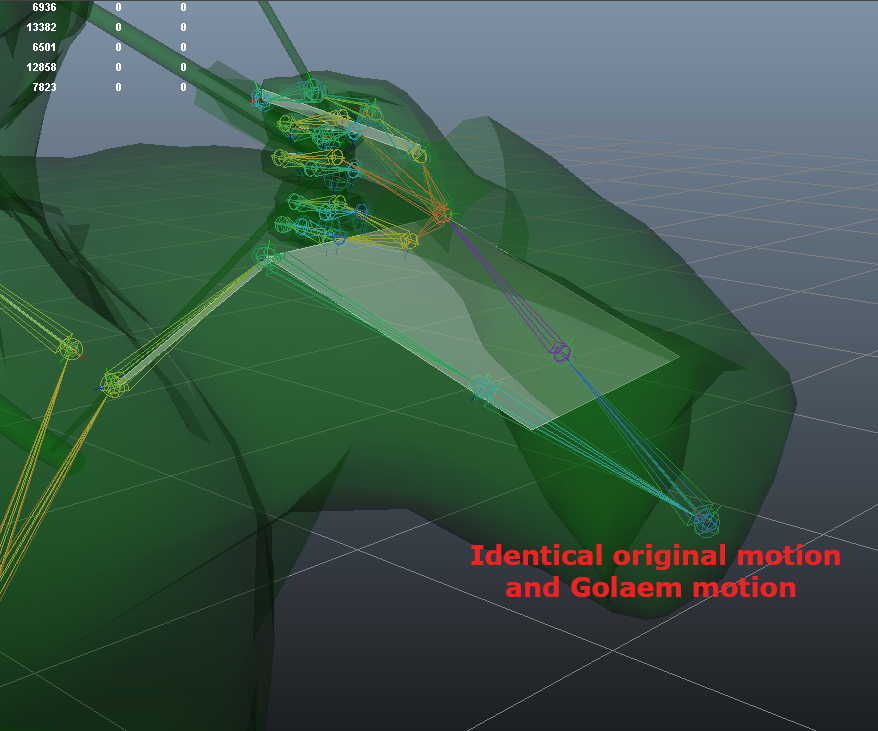
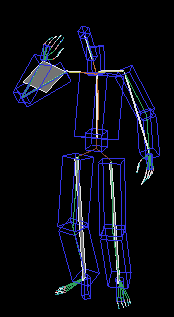
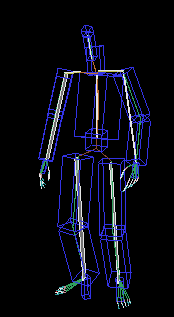
Once a motion is loaded successfully, it will also be displayed on the Character Maker Locator node. This preview is also useful as feedback for editing the motion (see below).
Once a motion is imported, the Golaem Conversion Quality indicator will show a red to green color indicating the conversion quality for each frame (green being the best possible conversion quality).

The upper graph represents the quality on positions
The middle part represents quality on orientations
The lower part represents quality on scales
Here is how to read the information on this graph.
| The upper part of each graph represents the average quality conversion. It gives a good overview of the conversion quality. On this sample, the average conversion is good (green) for positions, orientations and scales in all frames of the animation. |
 |
| The lower part of each graph represents the worst bone conversion quality among the conversion qualities of all bones. On this sample, the worst conversion quality is good (green) most of the time, but bad (red) for the orientation of some frames. The positions and scales are all fine on this sample. |
 |
If the indicator is not green, more information can be obtained by clicking on the left arrow:
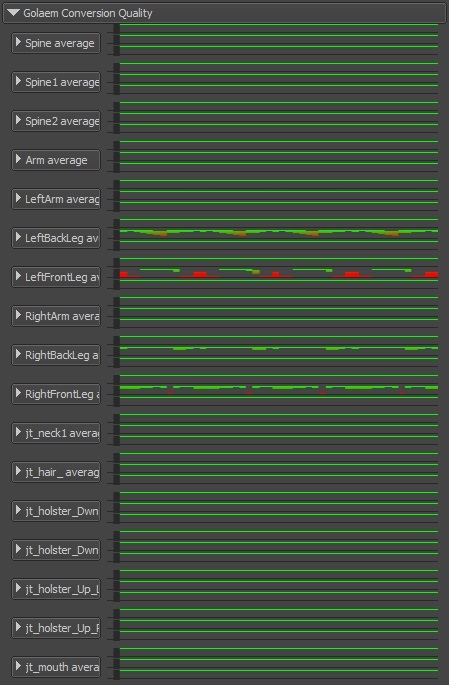
This panel shows the conversion quality limb by limb
Here also, the upper/middle/lower part represents the conversion quality for positions/orientations/scales
Finally, the bone by bone quality can be obtained by clicking on the left arrow of each limb:
Once again, the upper/middle/lower part represents the conversion quality for positions/orientations/scales
When a motion is not correctly converted, it usually means:
- that the source animation is not a forward kinematics animation with degrees of freedom on rotations only. You can check on the Forward Kinematic Animation Compatibility indicator to ensure that:

On this illustration, the animation is compatible with forward kinematics most of the time, except for a few frames
- or that that Skeleton Mapping file does not allow to store all degrees of freedom correctly. In this case, you should consider doing the Skeleton Mapping differently.
Note that the quality value of a bone is dependent of all the hierarchy: if an arm get a bad score, it may be because the spine got a bad score. When trying to correct this value, one should always start by checking the deepest bone in the hierarchy that have a bad score.
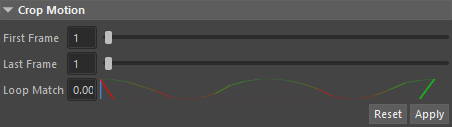
Cropping a Motion
The Character Maker allows to remove frames from the start and the end of a Motion through cropping.
Parameters
| First Frame |
First frame of the cropped Motion, in Maya's timeline. If the First Frame and the Last Frame are identical the motion is not cropped. |
| Last Frame |
Last frame of the cropped Motion, in Maya's timeline. If the First Frame and the Last Frame are identical the motion is not cropped. |
| Loop Match | The loop match indicator gives an indication of the loop quality. It will refresh when you changes the First Frame or Last Frame parameters. The lowest is the value, the best the loop result will be, a 0 value indicating that the postures are strictly identical. |
To apply the cropping, click on the Apply button in the Crop Motion group box. The Motion can be restored when clicking the Reset button.
- Number Of Frames
- Duration
- Position Offset
- Linear Velocity
- Orientation Offset
- Angular Velocity
Editing a motion
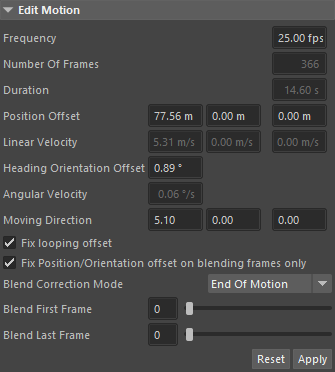
Edit Motion Panel
The Character Maker allows to change the frequency of the motion, the total translation and rotation but also to cyclify it, which is required by the Locomotion Behavior but also by the Motion Behavior when running the motion in a loop. All the options for editing a motion are contained in the Edit Motion group box.
Parameters
| Frequency |
Frequency of the motion, in frames per second. When loading a motion from Maya, the frequency matches Maya's time unit. Changing the Frequency will also change the Duration of the Motion (see below). |
| Number Of Frames |
The total duration of the motion, in frames. This value cannot be edited, but it is set when importing the motion from Maya, according to the playback range. |
| Duration | The total duration of the motion, in seconds. This value cannot be edited, but it depends on the Frequency and the Number Of Frames: Duration = (Number Of Frames - 1) / Frequency. The last frame is used for looping, hence the -1. |
| Position Offset | Total translation vector of the Pelvis bone during the motion. This value can be edited to avoid sliding feet, or to give a translation to a static motion. Keep in mid that the Locomotion Behavior requires motions with a non null Position Offset and/or Orientation Offset. |
| Linear Velocity | Velocity vector of the motion. This value is not editable, it is computed as Position Offset / Duration. |
| Heading Orientation Offset |
Total heading rotation of the Pelvis bone during the motion. |
| Angular Velocity | Angular speed of the motion. This value is not editable, it is computed as Orientation Offset / Duration. |
| Moving Direction | Moving direction of the motion (main direction in which the root is translating) |
| Fix looping offset | Allow to fix the looping glitch that is due to difference of attitude/bank orientation on the pelvis between the first and last frame (posture glitch needs to be fix with blending frames) |
| Fix Position/Orientation offset on blending frames only | This option allows to change only a subset of frames when changing the global position/orientation offset of the animation. If checked, only the frames between the First Frame To Blend and Last Frame to Blend will have their tansforms modified. |
| Blend Correction Mode |
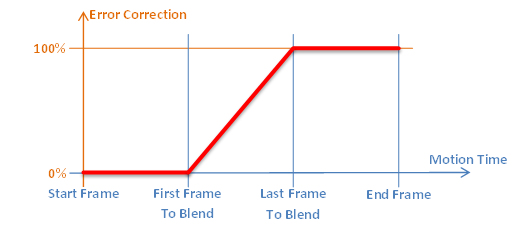
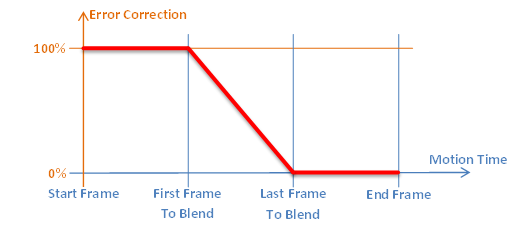
Defines how to blend the motion so that the start frame and the end frame are identical. The Character Maker computes the difference, between the first and last frame of the motion. An error correction is applied to the original Motion according to a piecewise continuous linear function (see figures below). Two options are available:
|
| First Frame To Blend | First frame, in Maya's timeline, from which to linearly increase or decrease the error between the start frame and end frame of the motion (see above). If the First Frame To Blend and the Last Frame To Blend are identical, no blending is done. |
| Last Frame To Blend | Last frame, in Maya's timeline, up to which to linearly increase or decrease the error between the start frame and end frame of the motion (see above). If the First Frame To Blend and the Last Frame To Blend are identical, no blending is done. |
Here's an example of a Motion that doesn't loop and the results of the two different blending modes:
 Start Frame |
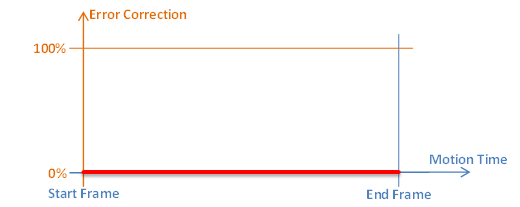 No error correction (original Motion) |
 End Frame |
Start Frame |
 End Of Motion error correction |
End Frame |
Start Frame |
 Start Of Motion error correction |
End Frame |
Note that even if the parameters are called "Blend" for comprehension purpose, the real algorithm that is used is a little bit different:
- at first, an error is computed between the first frame and the last frame;
- then the error is slowly added to each posture from the first frame to blend till the last frame to blend.
This algorithm allows to keep a better motion identity that simply blending the first and last frame.
To apply the new motion parameters, click on the Apply button. The Character Maker Locator display updates to show the edited motion. The motion can be reset to its original by clicking the Reset button.
Computing Footprints
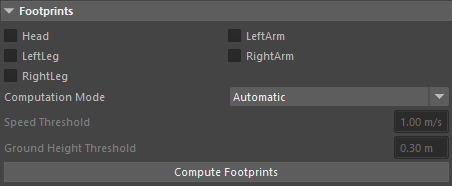
Footprints panel
Footprints are needed for correct ground adaptation. As the Skeleton Mapping can contain any number of limbs, it is up to the user to decide which limbs to adapt to the ground. These limbs need to have footprints.
Parameters
| Computation Mode |
|
| Speed Threshold |
Speed of a Limb's end bone under which a footprint is detected on the Limb in Manual Computation Mode. |
| Ground Height Threshold | Height of a Limb's end bone under which a footprint is detected on the Limb in Manual Computation Mode. |
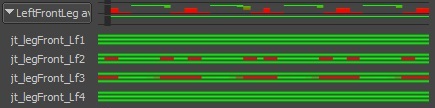
To compute footprints, first select the required limbs (usually the limbs tagged as legs), then click on the Compute Footprints button. The limb names and attributes are displayed in the Main Workspace. The Character Maker Locator will display a red rectangle on the limb whenever a footprint is active.
Footprints Computed on a walk cycle
Golaem XML Motion Files
The Character Maker can also load and save Golaem XML Motion Files (*.gmo.xml). These files cannot be directly used in a crowd simulation and are mainly intended for advanced users and debugging purposes. An XML Motion File can be edited in a text editor, reloaded into the Character Maker, and saved back to a binary Motion File that is usable in a crowd simulation.
To load or save an XML Motion File, select the Golaem XML Motion File type at the bottom of the load or save Motion File dialog (see below).
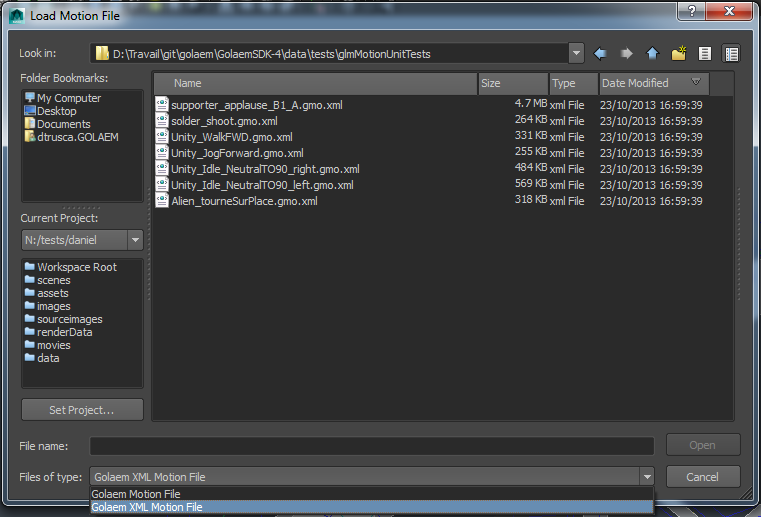
Loading a Golaem XML Motion File
Batch Export Motion Files
The conversion of Motion Files can be automatized using the MEL/Python glmExportMotion command