
Golaem 7 featured in Digital Production
Our friends from Digital Production (http://digitalproduction.com) included an article in their 2019-6 edition about the basics of Golaem 7 new Layout Tool and how to make the most of it to populate your shots with animated characters.
Read the whole article (in German)
Here is the English translation
Golaem Layout is a plugin for Maya which helps populating CG scenes with animated characters vignettes (whatever they are: humans, arachnids, horses…) by manipulating them with Maya tools and with the help of smart non-destructive layers (automatic ground adaptation, look at layer, mesh/shaders randomization…).
Originally available in Maya, as a retake tool for Golaem Crowd Simulations in 2016, Golaem Layout quickly started to be used by artists as a standalone tool to create simple population scenes faster. Golaem 6 acknowledged this new usage by introducing a Library Tool enabling to gather animated characters scenes in a library and importing them to be slightly (or totally) modified in each shot.
Golaem 7, released this summer, pushes the concept further as it introduces posture and rig layers which enables to reanimate a character manually, but still benefiting from the Golaem Layout performances and all smart layers. The user interface also has been transformed into a nodal editor so that it is really fast to reapply modifications done on a character to other characters, or randomly on the whole population, or in a given location of the scene.
This new user interface being based on Python, it can be easily opened in other DCCs, allowing artists to benefit from round-trip modifications between Maya<->Unreal, or Maya<->Houdini for example.
 |
 |
Importing Character Vignettes in your scene
Whether you are in Maya, Katana, Unreal, Houdini… the process is overall the same: open the library tool and click on the Character Vignette you want to import, then scrub the timeline and see your Golaem characters moving.
Depending on the software you are in and the renderer you are using, the way to get shaders on your characters may vary however. This process is covered by dedicated videos explaining how to create your dcc/renderer specific shaders so they will be used on your Golaem Layout characters.
For simplicity sake, the following parts of the article will be written as if you are in Maya.
Layouting your scene
Once your characters have been imported in your scene and properly shaded, it’s time to place them in your scene and direct them.
Switch to vertex selection mode (F9) and select one or more characters. They should be now highlighted in green (otherwise you probably selected some meshes or particles behind, just hide them for now or make them non-selectable).
You can now transform your characters using the usual Maya tools (Translate / Rotate / Scale). So far, except for the performances of the display if you have many characters, nothing really impressive, right?
Well, try moving them on a non regular terrain, like a slope, or from the sidewalk to the street level. Do you notice how they adapt themselves to the terrain height? By default, it is a very simple height adaptation, but there are some more precise modes like IK adaptation.
By the way, coming back to performances, did you try to save the scene? If you do, you will notice that you can have thousands of characters in the scene, it saves almost instantly and the file size is very reasonable. Indeed, Golaem Character Vignettes acts like smart proxies/stand-ins.
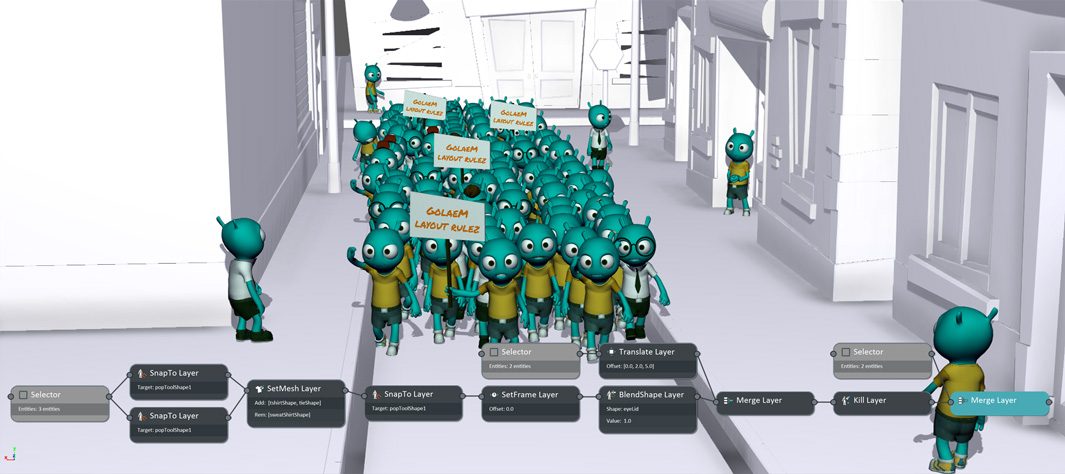
Layers overview
After playing with your characters, you can click on the Layout Editor button to open the graph Golaem Layout created based on your inputs. You should see some simple nodes like Selector, Translate, Rotate and so on. This graph describes to Golaem Layout how to build your scene based on input Character Vignettes. You can plug more nodes following the simple transforms, to scatter characters around the scene, control blend shapes, add or modify animation, change trajectories, and so on.
The nodes are non destructive, which means you can change your mind at any time and modify them, apply them to more characters, or completely disable them. You can even have different branches in your graph and activate one or another to do some tests, or based on the camera in the shots, etc.
At the left hand side stands the Layout Nodes Library, listing all the nodes you can use. Let’s see what it contains
Selection nodes
Selector: The Selector node specifies which characters will be affected by the nodes following it in the Graph. It can be created by selecting characters and double clicking a node, or by filling an expression to determine characters ID. There is also a “Keep percent” parameter to select characters randomly in a group.
Transform Nodes
Translate / Rotate / Scale: The translate, rotate, scale nodes enables to transform characters. As with Maya objects, the values can be keyframed, and noise can be added to generate diversity when dealing with multiple characters. These are the basic nodes which will enable you to place you vignette where they should be played in your scene.
FaceTo: The FaceTo node enables to make characters face a given position. You can think about a stadium and orienting all characters toward the center of the stadium for example. A locator can be created and keyframed to represent the target. Again noise can be added to give a bit of diversity and get a more natural result.
Expand: The Expand node scales a group, which means it makes character closer or further to each others. Very useful if you want a group to look more or less dense.
Multipliers nodes
Duplicate: The Duplicate node is like a copy/paste of characters. The duplicated characters can then be modified (for example their outfits randomized or noise added on their animation, etc) to make them look different than the source character. This node is useful if you need to duplicate a particular group of characters and fine tune it.
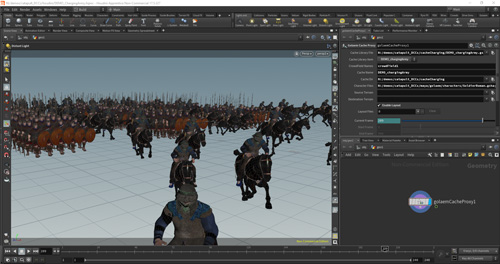
SnapTo: The SnapTo node does the same as the Duplicate node, but it uses a Golaem Population Tool (the tool used to scatter characters in a scene) to know how much characters should be duplicated and where they should be placed. This would be the tool you use to place a large number of characters precisely (think populating a stadium, or creating soldiers units following a precise pattern).
Kill / Unkill: The Kill/Unkill nodes simply enable to remove a character from your scene. For example, if the director does not like a specific character, you can just select it and remove it.
Animation nodes
SetFrame / FrameOffset / FrameWarp: These nodes enable to offset or change the speed of the characters animation either with a given value, randomly, or using keyframes. It can be used to create ping-pong animation, playing it reverse, add diversity on a group of duplicated characters, create a timelapse effect…
Posture: The Posture node can recreate Maya joints on top of the Golaem characters so that you can reanimate it using any tool you would like
Rig: The Rig node goes one step further than the posture node and can create a simple rig on your Golaem characters so that you can quickly manipulate and reanimate them using Inverse Kinematic.
LookAt: The LookAt behavior can make your characters follow (or aim) a target with one of their joints (usually head, but could be the arm if carrying a weapon). As for other behaviors, the target can be a keyframed locator, and can be relative to the characters or absolute in the scene. This is quite useful to control the gaze of two characters crossing each other in the street for example.
BlindData: The BlindData node enables to replay additional animation data, like BlendShapes. It can load the list of all data available for a character and enables to keyframe them and noise their values.
GroundAdaptation: The GroundAdaptation node enables to control how a given set of characters will adapt to the ground geometry. It can be simple height adaptation of the characters’ root bone, or height adaptation + orientation, or IK adaptation so that feet are correctly oriented following the slope.
Navigation Nodes
TrajectoryVectorField: The TrajectoryVectorField node can read a VectorField painted with the Golaem paint tool on the scene geometry and make the characters follow this trajectory, even if they were going straight in the Character Vignette source animation. Imagine you have a Character Vignette of a character walking straight and you need to make him turn right at a street crossing: just paint vectors and apply a TrajectoryVectorField!
Assets nodes
SetGeometryFile: The SetGeometryFile node can be used to select the Geometry file a Golaem Character should use. Indeed Golaem characters can have multiple geometries, for example for Level of Details purposes.
SetRenderingType: The SetRenderingType node can be used to change the general aspect of a character. In Golaem, RenderingTypes are a set of rules deciding which assets characters should use. For example, you character could have winter/summer RenderingTypes, or business/casual RenderingTypes. When duplicated characters, it may be interesting to change the rendering type to quickly get a totally different visual aspect.
SetMeshAssets / AddRemoveMeshAssets: These nodes can be used to precisely decide which assets a Golaem Character should use. The classic example is the director saying “I do not like the fact that this character wears a t-shirt”. Select the character, add a AddRemoveMeshAssets, remove the T-Shirt and add the Shirt asset for example.
ReplaceShader: The ReplaceShader can be used to override a shader used on characters by another one
SetShaderAttribute: In Golaem, the shader variations are driven using ShaderAttributes, which values can be automatically randomized by Golaem. Using the SetShaderAttribute, you can decide the value of theses attributes for a particular set of characters. Doing this you can decide that a particular character will wear a yellow t-shirt for example.
Helpers nodes
Notes: Using the Notes node, you can leave comments on parts of the graph, to explain coworkers (or your future self!) which characters they affects and what they do
Group: The group node enables to group nodes together when they have a common purpose.
Merge: The Merge node enables to gather various branches of the graph together.
But how do you create those Character Vignettes by the way?
There are multiple ways to create vignettes.
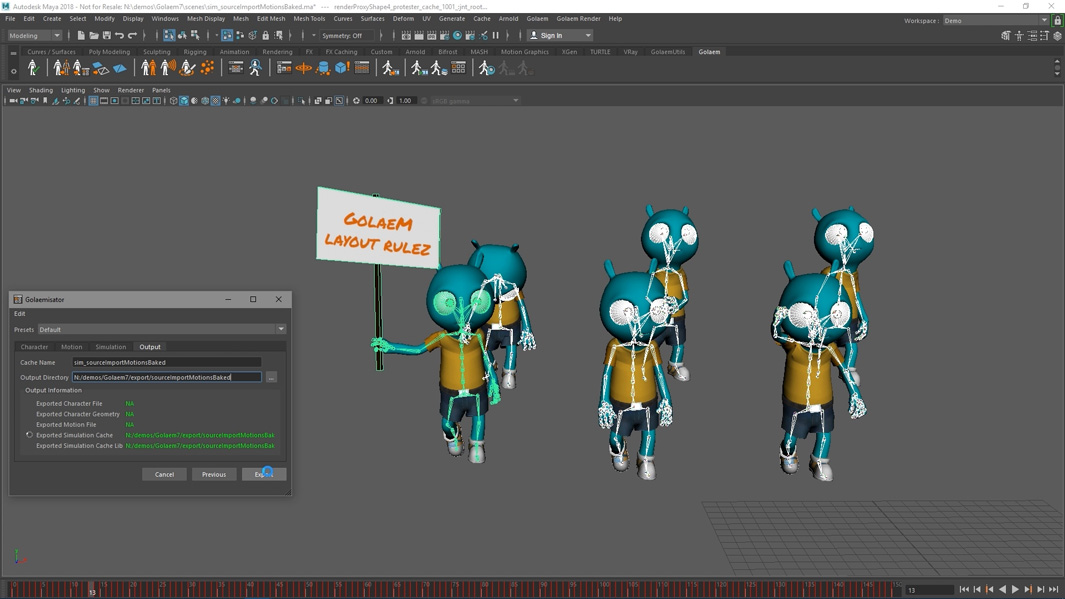
With Golaem Layout, you can use the Golaemizator tool (note: only available in Maya) to convert Maya keyframe or mocap animated characters to Golaem Character Vignettes. This way you can transform anything you can import in Maya into a Golaem Character Vignette.
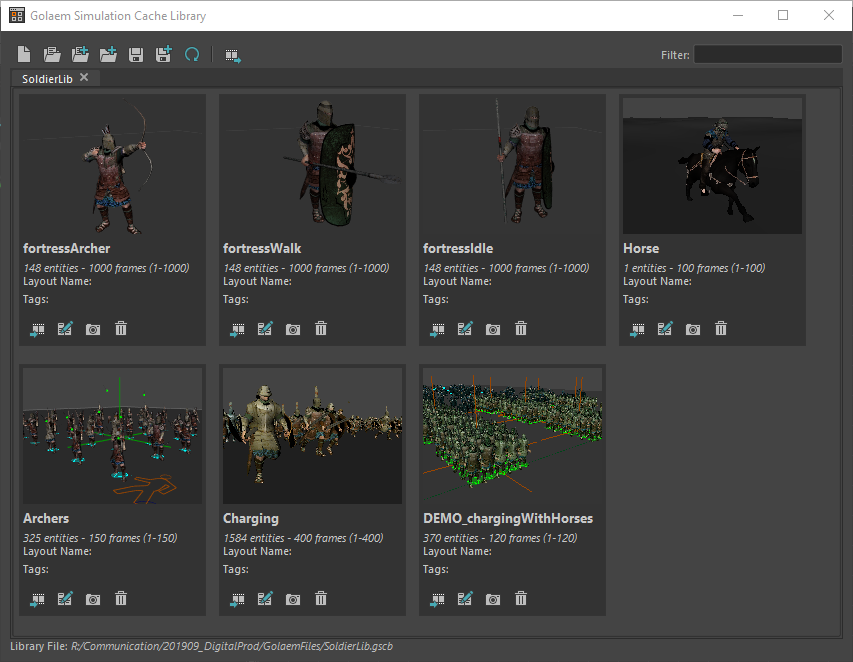
If you are already doing simulations using the Golaem Full version, you can just load the Character Vignettes created when exporting your simulation.
Build a Master Layout
The Golaem Layout workflow gives the full extent of its potential when you have a large number of shots to populate with ambient population. The best way to achieve this is to have a master scene with all your characters and every animation they can play, and export this scene to what we will call a Master Golaem Layout (either by simulation or with the Golaemizator Tool).
Once it is done, for each shot, you can create import the Master Layout as read-only and create a shot specific layout layer to keep only the characters you need and layout them in the shot. This way, if you need to change something in a character or animation, you can just change the Master Layer and it will be propagated to all your shots automatically.
Even better, at each revision, you can create a new Layout layer for your modifications and keep a lightweight non-destructive history of all revisions in your scene.
Actually this Master Golaem Layout and individual Character Vignettes can even be created automatically each time a new animation is pushed on your assets system. All the Golaem Layout Tools are scriptable and there is even a C++/Python SDK to read/modify caches in case you need some automation or want to display Golaem Layout Characters on a proprietary or non-supported platform.
Setup your characters for easy variations
Golaem provides ready-to-use characters for usual situations like casual people, business people, roman or middle age soldiers, etc. To maximize the possibilities of variations, they are built with separated assets (tshirts, trousers, shoes, …) in different versions, all skinned onto the same skeleton. There shading graph also includes multiple textures and color variations per mesh.
Golaem then provide the possibility to organize them per-group and choose for each item a kind of probability of using it, using simple sliders. The asset variation is then done automatically by Golaem when generating characters. If you build a character and model assets from scratch you should do the same.
However nowadays, the usage of scanned characters (or commercial libraries of characters like RenderPeople or Mixamo), makes it difficult to separate assets and a character often comes in one mesh only. In this case (and provided the characters are all mapped on a skeleton with a similar structure, even if the bone lengths vary), Golaem recently added the possibility of building a generic Golaem character with all those one mesh bodies as variations and be able to choose how much of each type you want to use. Of course, you can change the type of character on the fly thanks to the Layout node, so this is really convenient.