
Creating the Model
This tab will configure and launch the model training.
By default only the clear/train/export to tensorRT buttons are visible, advanced properties are in a drowdown list on otp of the tab.
MEL command
A MEL Command is available to launch the training.
glmDeepTrain -ioConfFile /path/to/file.dio
Interface
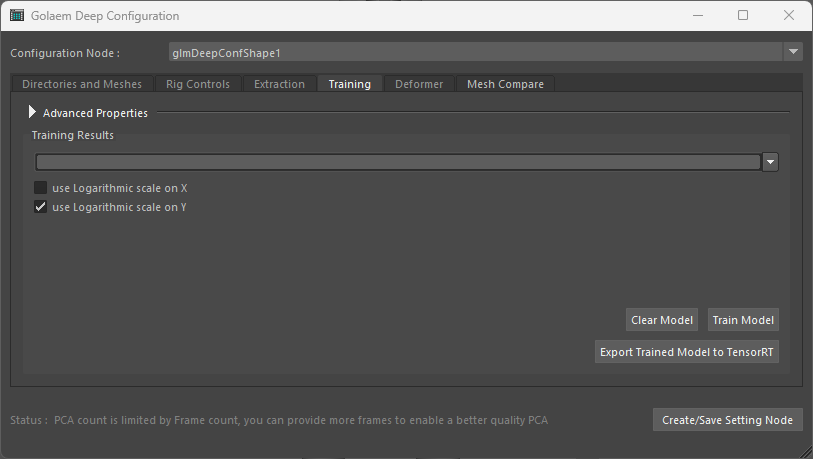
Default Training interface

Displaying advanced properties
Button Commands
| Clear Model | Clear the model. Should be done after changing the RIG inputs or the training parameters |
| Train Model | Launch the training (long process) |
| Export Trained Model to TensorRT | If the model already exists but has no TensorRT model counterpart, this will produce the TensorRT version. This is done by default after each training, so this button should probably not be used. |
Advanced Properties
Bold : Critical Parameters
| Available Extracted Frame Count | Displays the available frame count if any. This gives some feedback of current training set size as it is incremental |
| PCA Performance <-> Quality Enable PCA |
PCA can be enabled or disabled at user request. It is specially useful on large meshes (10k+ vertices) or when using CPU training/inference to reduce computation cost. PCA size is bound by extracted frames at max, or 1-10% of vertices by default. Higher count is better quality but less performance. |
| Differential Model Layers Count | This is usually best let to default. LLower values could be used on models used on CPUs to keep computation cost manageable. On GPU there is no big performance hit using the default max parameter. |
| Neurons Per Layer | This is usually best let to default. Lower values could be used on models used on CPUs to keep computation cost manageable. On GPU there is no big performance hit using the default max parameter. |
| Batch Split Divider | Divides the training set in the given number of batches to imrpove learning (but learning is slower). Best let to default |
| Epochs For Differential | Keeps it 2x to 10x higher than fo subspaces. This is the epoch count of training for the main model, learning deformations relative to vertices nearest neighbours. Values for production models should probably be between 2k and 10k. Learning is usually done on GPU if available as this is faster |
| Epochs For Subspaces | Epoch count used for training subspace models, which learn vertices deformation deformations in mesh-local referential for a small subset of vertices (anchors) used as references. Learning is done on CPU by default which will be faster for those little models. |
| CPU Threads | Best let to default |
| Anchor Point Percent | A higher count allows to have a wider range to modulate inference performance / quality, but is more expensive to train. Upper bound is 10% (of vertices), but default value of 2% should be fine. |
| Additional Anchor Points Indices | "Show In Maya" : will report the array selection to the maya outliner. |
| Additional Anchor Points Clear | Clear additional Anchor points indices. |
| Additional Anchor Points SIM (alpha) | Show additional Anchor points as vertex components directly on the mesh(es) |
| Additional Anchor Points Pick From Selected Vertices (alpha) | This creates a place holder Maya node referencing the Deep configuration (if not already created) , and saves the current configuration to the file. |
| Learning Rate | Gives the speed of convergence of the training. A default Value of 0.0001 converges quite fast. A value of 0.00001 would be more suited for more quality oriented models (with more epochs to let model converge). Higher learning rate values such as 0.001 should not be use as they are easily stuck in local minimae. |
| Learning Rate Decay Epochs (alpha) | Each epoch count, will divide the learning rate by the given divider, allowing a better convergence. This does not work as well as intended, and should probably let to an unreachable epoch count. Else values such as 1k epoch makes sense. |
| Learning Rate Decay Divider (alpha) | Each epoch count, will divide the learning rate by the given divider, allowing a better convergence. This does not work as well as intended, and should probably let to an unreachable epoch count. A divider between 2 and 10 seems reasonable. |
Interpreting the Learning Curves

Curves display while training
The training should display the curves of its current learning models. Usually the longer curve is the learning curve with more epochs, for the "main" model construction deformations based on vertex neighbors and RIG Inputs. The shorter ones are for the models predicting deformation a single vertex, "anchor", in mesh local space.
The ordinate is the epoch count, the abscissa is dynamically scaled to the learning model results, and displays the result of the mean square error of training set and test set. Globally the curves should go down. Curves going up after going down would means that either the learning rate is too high, or there is no sufficient sample count.
The blue curves are the validation set loss curves.
The green curves are the training set loss curves.
Overfitting model
Defined by a near perfect training loss, and a bad validation loss. It is often caused by not giving enough samples to the model, which tend to match exactly inputs but do not generalize correctly. You will see then that the training loss curve will go flat/ up, training and validation loss curves have a great difference. Validation loss lowers if you gives more samples.
Underfitting model
You should only seldomly see that. It is defined by a bad training loss AND a bad validation loss. Model cannot learn and generalize correctly. The model is probably too simple to handle the complex deformations, try to raise the neuron count or layers. Another reason of underfitting would be if the configured RIG Inputs do not have a correct correlation with the deformations, which gives model no clue about what to learn from.
Using Epistemic Error to find what would be missing samples
To have an idea of what is missing as samples for training, you can use deformer "show epistemic error" that will display a green red heat map of the uncertain regions, see Using Deformer