


Layout Editor Keyframable Parameters
As of August 5th, 2025, Golaem will no longer provide direct support.
All support for Autodesk Golaem will now be handled exclusively through Autodesk support channels and this website will be deactivated.
Please bookmark the Autodesk Golaem Support section for any future support needs related to Autodesk Golaem packages.
Enabling keyframes on a node parameter
Some of parameters of the Layout nodes can be keyframed. Such parameters are recognizable by the "Use Keyframes" checkbox that appear on top of the parameter's value in the Attribute Editor panel:
![]()
Example of a keyframable parameter named "translate" in the Translate layout node
To use keyframes, simple check the "Use Keyframes" checkbox, and the parameter will change to allow editing the keyframes:
![]()
Example of a keyframed parameter named "translate" in the Translate layout node
Editing the keyframes
With the Golaem Layout Editor
The Attribute Editor panel allows to directly add/remove/edit keyframes from a few controls:
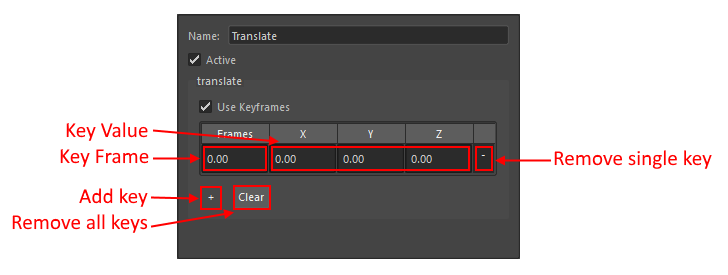
Controls of keyframed parameters
| Key Frame | the frame |
| Key Value | the value at the given frame |
| Add Key button | clicking here will add a keyframe in the list |
| Remvoe single key button | clicking here will remove the keyframe |
| Clear button | clicking here will remove all keyrames except one |
With the Maya Graph Editor
When the "Use Keyframes" option of a parameter is checked, the cache proxy automatically create plugs that are connected to maya animation curves:
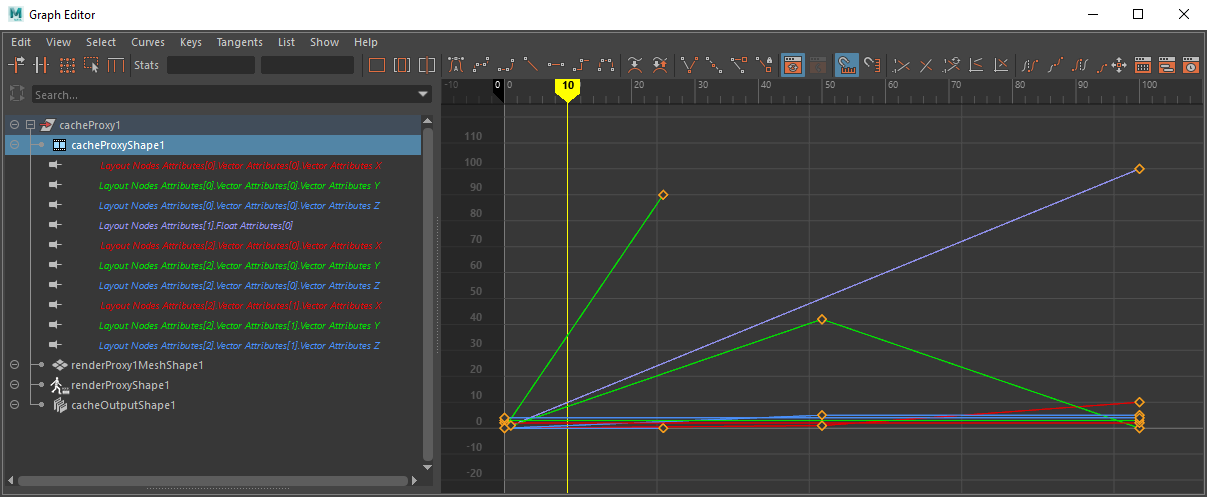
Example of the animation curves that are automatically created on a cache proxy when using a layout with keyframes

Layout graph that produces the above animation curves
The names of the plug allows to find the node it is connected to. For instance in the above example:
- "Layout Node Attributes[0]" refers to the node ID 0 in the layout graph
- "VectorAttributes[0]" refers to the parameter at index 0. In this case it's a vector parameter, so it is named "VectorAttributes" and has 3 curves:
- VectorAttributeX
- VectorAttributeY
- VectorAttributeZ
- "VectorAttributes[0]" refers to the parameter at index 0. In this case it's a vector parameter, so it is named "VectorAttributes" and has 3 curves:
- "Layout Node Attributes[1]" refers to the node ID 1 in the layout graph
- "FloatAttributes[0]" refers to the parameter at index 0. In this case it's a float parameter, so it is named "FloatAttributes"
- "Layout Node Attributes[2]" refers to the node ID 2 in the layout graph
- "VectorAttributes[0]" refers to the parameter at index 0. In this case it's a vector parameter, so it is named "VectorAttributes" and has 3 curves:
- VectorAttributeX
- VectorAttributeY
- VectorAttributeZ
- "VectorAttributes[1]" refers to the parameter at index 1. In this case it's a vector parameter, so it is named "VectorAttributes" and has 3 curves:
- VectorAttributeX
- VectorAttributeY
- VectorAttributeZ
- "VectorAttributes[0]" refers to the parameter at index 0. In this case it's a vector parameter, so it is named "VectorAttributes" and has 3 curves:
The curves can be manipulated directly within the Maya Graph Editor, and any change should be seen in the layout editor as well.
Note that it is sometimes required to refresh the layout previz by changing the current Maya frame before being able to see the change
From another Maya object
Instead of directly editing the animation curves, it is sometimes convenient to drag the parameter's value directly from a Maya object's position. It is possible to do so by connecting each of the plugs mentioned is the previous section to the transforms plug of Maya objects.
This process can be done automatically by right clicking on the node and clicking on "Create Locators For Keyframed Attributes":

The "Create Locators For Keyframed Attributes" option
This will create a locator named "glmLayoutNodeXXX_YYY" where XXX is the node ID and YYY is the name of the parameter. This locator will already be keyframed with the current frame of the parameter, and will be connected to the cache proxy in such a way that it will drive the parameters of the layout whenever a keyframe is added or deleted from the object cuves:
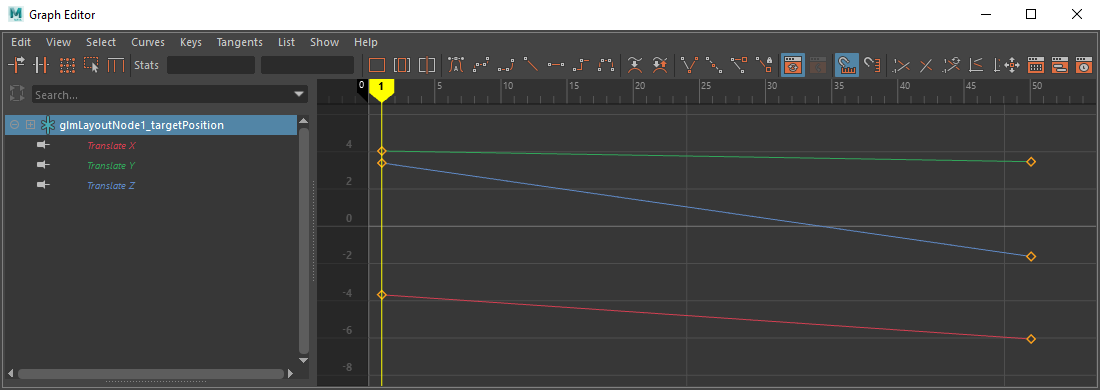
The locator created from clicking on the "Create Locators For Keyframed Attributes" option
The locator is directly used to drive the layout parameter keyframes values