


Geometry Tab Overview
The Geometry Tab defines the Golaem Character geometry information, the way the meshes and furs are distributed among Entities and the way they are shaded. Character geometry is defined in two steps:
- Define the available Geometry Assets
- Define how the Geometry Assets vary across characters (through weights) using the Rendering Types Panel
Golaem Character Maker - Geometry Tab
The information shown in this tab is relative to the Character File displayed in the active tab of the Main Workspace. To start using the Geometry Tab you have to either load a Character File (.gcha) or load a skeleton from a Maya joint hierarchy (see Skeleton Tab).
Geometry Toolbar
 |
Import Geometry |
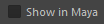
Imports the selected geometry from Maya to the Character Maker. This includes Shading Groups, Shader Assets and Shader Attributes. Maya Groups get translated as Asset Group Nodes. If a Maya Group has an extra custom boolean attribute named glmIsWeighted and set to 1, its corresponding Asset Group Node will be automatically weighted. If it also has a string attribute named glmWeights, the values separated by ; will be assigned as default weights to its children.
If an integer attribute User Data Shader has an extra custom boolean attribute named glmIsWeighted and set to 1, its corresponding Shader Attribute Node will be automatically weighted. If it also has a string attribute named glmWeights, the values separated by ; will be assigned as default weights to the ranged values. If a Material has an extra custom string attribute named glmPreviewShader, its corresponding Shader Node preview shader attribute will be filled with the same value. If nodes with the same name are present in the Character Maker, the user is prompted to either keep the existing assets or replace them. |
 |
Import Skeleton Override |
Import the selected skeleton from Maya as a Skeleton Override node, already configured with the scale differences from the current skeleton. Only skeleton bones that have the exact same name will be taken into account. |
 |
Import Blind Data Override | Import the selected blend shapes as a Blind Data Override node. |
 |
Reset Shaders | Resets the Shading Groups, Shader Assets and Shader Attributes of the selected nodes (or all the nodes if nothing is selected). |
 |
Show in Maya | When checked, a node selected in the Character Maker is also selected in Maya if a match is found. |
Importing Geometry Assets from Maya
Geometry Assets
Geometry Assets are illustrated as nodes in a graph in the Main Workspace. They represent all the available assets (meshes, furs and shaders) on a character. The way these assets are organized determines the appearance and visual diversity of the Golaem characters at render time. It is strongly recommended to check the Geometry Character Prerequisites before defining the assets of a Character.
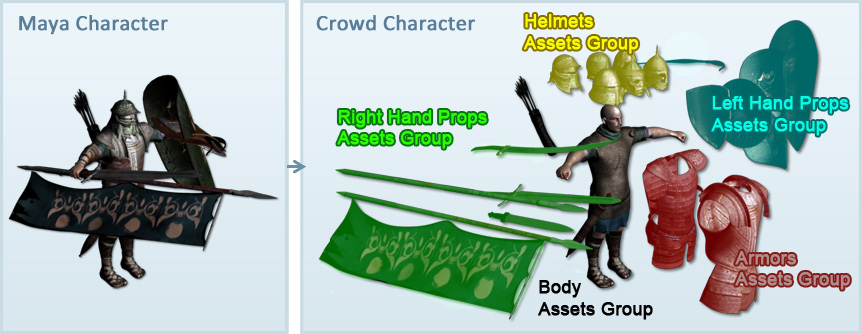
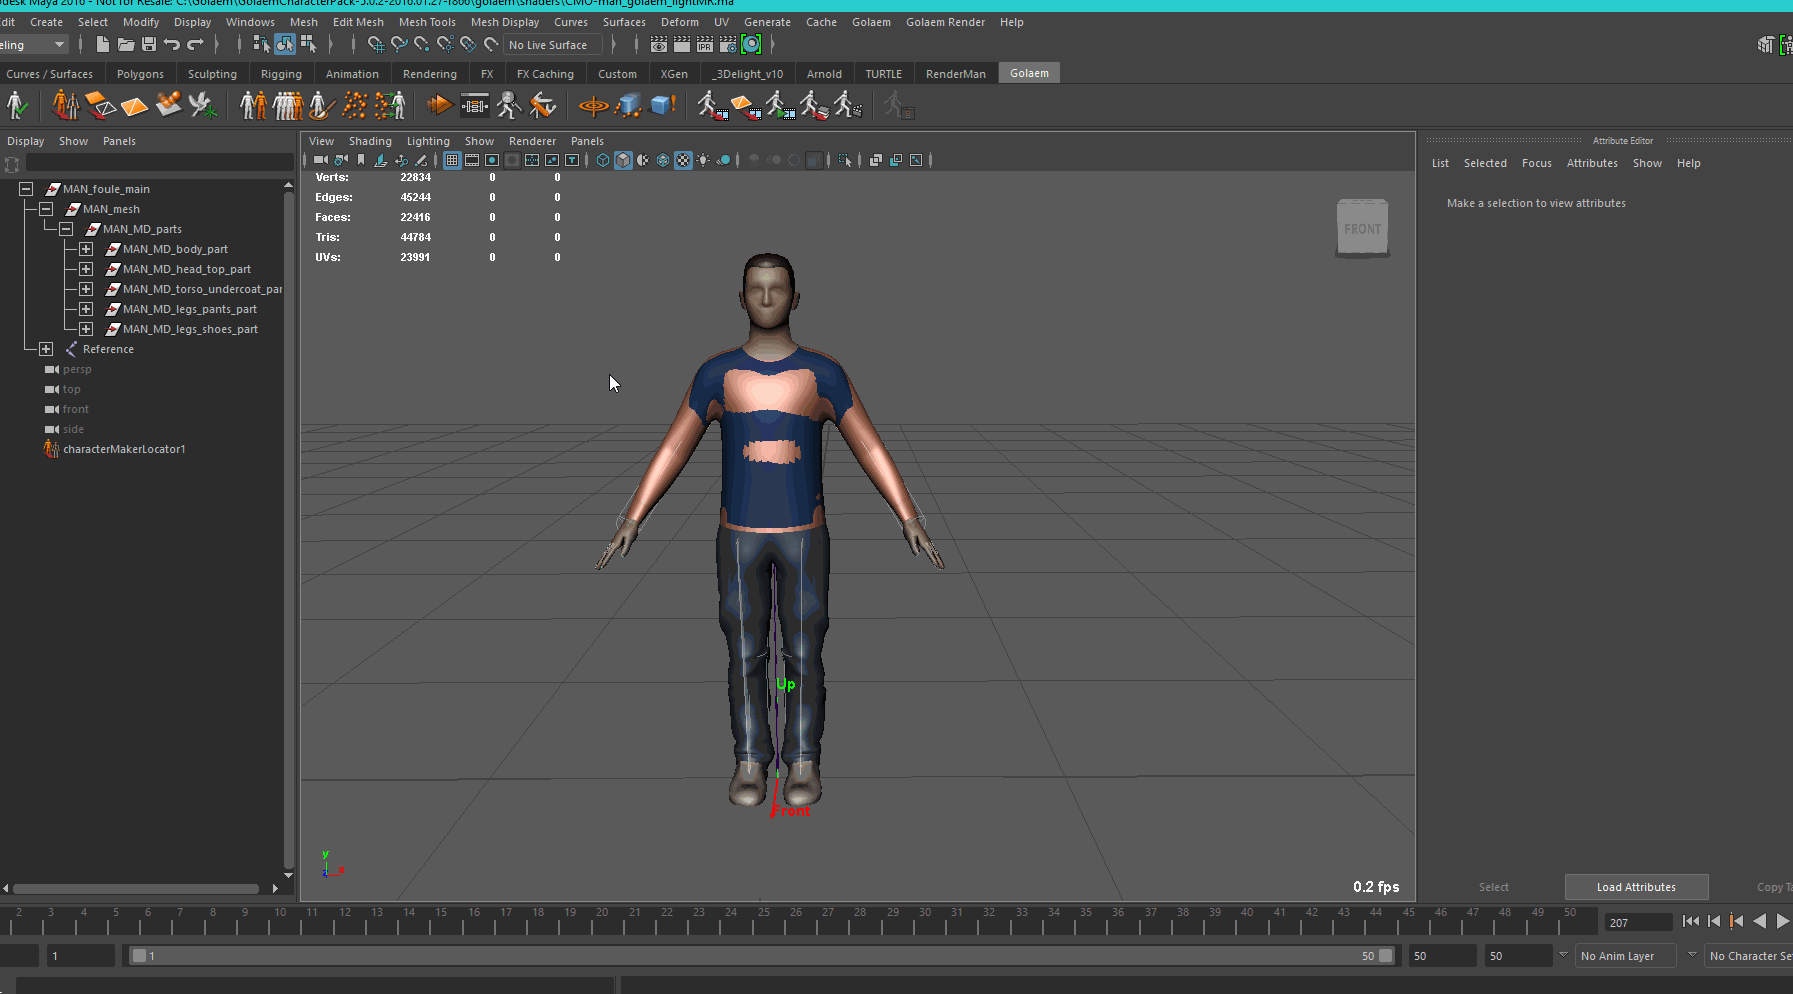
Assets Character created from a Maya Character
It is important to notice that ONLY the names of the meshes and the shaders are stored in the Character File and not the actual geometry or the shading graph. Geometry will be stored in a FBX or GCG file (see the Character Node) and the shading graph in the Maya scene. More here.
The available Geometry Assets are listed in the Asset Nodes view (see below).
Asset Nodes View
This view provides access to the all the available asset nodes. To use a node, drag and drop it into the Main Workspace.
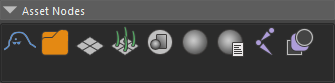
Golaem Character Maker - Asset Nodes View
 |
Character Node | This is the root node for all the geometry assets. There must be one and only one Character Node. All other geometry asset nodes must be connected (directly or indirectly) to this node in order to be taken into account. |
 |
Asset Group Node | An Asset Group Node represents a group of assets. An Asset Group can contain any number of Asset Groups, Mesh Assets or Fur Assets. If an Asset Group is weighted, only one of its child nodes will be chosen at render time according to the asset group's weights, otherwise all of its child nodes will be chosen. An Asset Group node can only be connected to another Asset Group node or to the Character Node. |
 |
Mesh Asset Node | A Mesh Asset directly represents a Maya mesh associated to the Character. A Mesh Asset node can only be connected to an Asset Group node. It can contain one or more Shading Group nodes. |
 |
Fur Asset Node | A Fur Asset defines how to render fur procedurally on a supporting Mesh Asset. It can be connected the same way as a Mesh Asset Node. It can contain one Shading Group node. |
 |
Shading Group Node | A Shading Group Node represents the name of the shading group applied on a mesh of the rendered geometry or a fur asset. Each Mesh Asset or Fur Asset node can have one or more Shading Group nodes attached to it. A Shading Group node can only be connected to a Mesh Asset or Fur Asset node. Depending on the renderer, Maya must contain either the shading group or its shaders, otherwise the corresponding meshes or fur assets will be rendered with the default shader (for more info, see the rendering workflow). Shading Group nodes can also contain one or more Shader Attribute nodes. |
 |
Shader Asset Node | A Shader Asset Node represents the name of the shader applied on a mesh of the rendered geometry or a fur asset. A Shader Asset node can only be connected to a Shading Group node. Depending on the renderer, Maya must contain either the shading group or its shaders, otherwise the corresponding meshes or fur assets will be rendered with the default shader (for more info, see the rendering workflow). |
 |
Shader Attribute Node | Shader Attribute nodes are used to pass random or PP attribute controlled values to the shading graph. These values can be retrieved by using the user data shaders provided for each renderer (for more info, see the rendering workflow). |
 |
Skeleton Override Node | A Skeleton Override Node represents an override on the bone sizes in the skeleton. It allows to add some diversity on the skeleton joints |
 |
Blind Data Override Node | A Blind Data Override node represents an override on the blind data (usually blend shapes) values. It allows to add some diversity on the blind data values without using a dedicated behavior |
 |
Physics Override Node | A Physics Override node represents an override the Physics properties of a bone of the skeleton (ragdoll shapes). It allows to change the physics collision shape of an Entity depending on its geometry assignment. |
Rendering Types Panel
Rendering Type
Rendering Types determine how the Geometry Assets are distributed to Golaem Characters, thus defining their appearance and creating visual diversity. Rendering Types allow to define populations or groups of entities by adjusting weights on Geometry Assets, describing the likeliness of their occurrence.
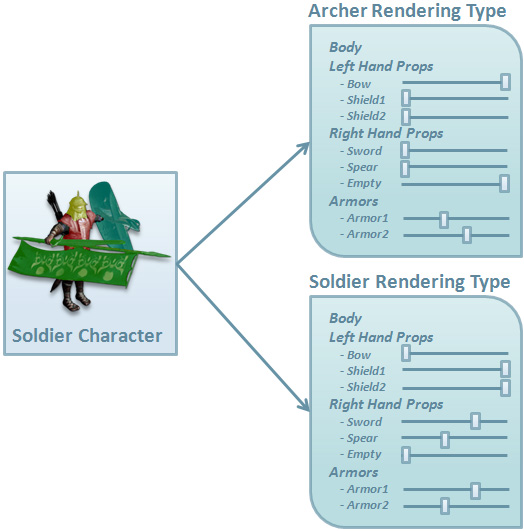
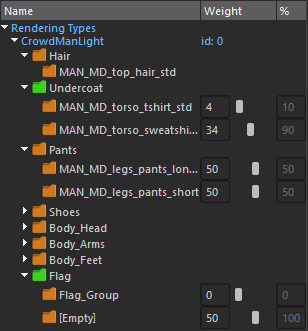
Example of Rendering Types created from a Crowd Character
Once defined, Rendering Types can be assigned to Entity Types. To understand the relationship of Rendering Types with other Golaem Crowd types, it is strongly recommended to visit the Main Concepts page for a practical example.
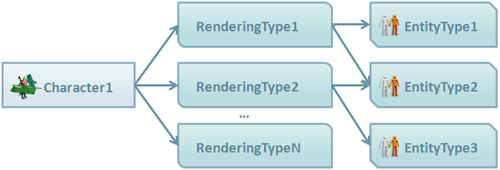
Relationship between Crowd Characters, Rendering Types & Entity Types
Note that you can create as many Rendering Types as you'd like for a same Character. They will all use the same set of Geometry Assets, as defined in the Main Workspace. If no Rendering Type is defined, the default weights defined in the Main Workspace will be used.
A Rendering Type defines the weights of all the weighted Asset Group nodes.
Golaem Character Maker - Rendering Types View
Each Rendering Type is displayed as a tree containing all the Asset Group nodes of the Character. Weighted Asset Group or integer Shader Attribute nodes display the weight of each of their child nodes (see figure above) and their relative percentages. Groups with weights that are different from their default weights (overridden weights) are displayed in green.
Changing weights
To change the weight of an item in a weighted Asset Group or Shader Attribute node, move its slider or enter the exact value in the text box. To change the weights of the whole group to the same value, hold Shift while dragging the weight slider of one of the items in the group, or hold Shift and press Enter after having entered the weight value in the item's text box.
Child Rendering Type
A Child Rendering Type is a copy of its parent Rendering Type which allows to modify only some of its weights and leave the other weights identical to the parents'. It can be viewed as a variation of a Rendering Type. Groups that override weights in a Child Rendering Type are displayed in green.
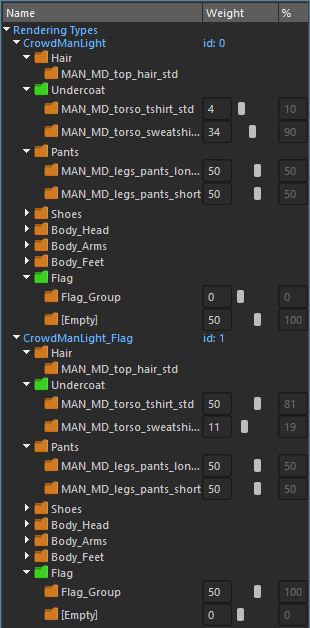
In the example below, the Child Rendering Type CrowdManLightSummer has the same assets as its parent Rendering Type, CrowdManLight, except for the Undercoat Asset Group where only t-shirts are allowed (sweatshirts set to 0) and the Pants Asset Group where only shorts are allowed (long pants are set to 0).
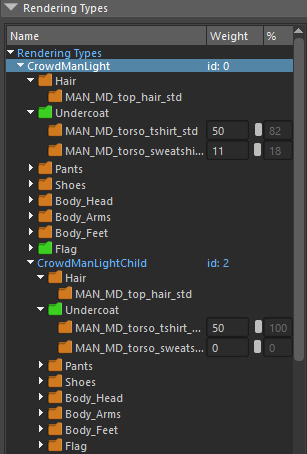
Child Rendering Type Example
Creating a Rendering Type
Notice that a default Rendering Type is created within each new Character File when its Geometry is exported for the first time. To manually create a Rendering Type, select the Rendering Types item and click the "+" button to create a new Rendering Type, and enter its name in the text dialog.
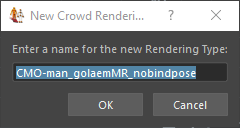
New Rendering Type dialog
Creating a Child Rendering Type
Select an existing Rendering Type and click on the "+" button to create a new child Rendering Type, and enter its name in the text dialog.

New Child Rendering Type dialog
Removing a Rendering Type
Select the rendering type and click on the "-" button.
Assigning a Rendering Type
In order for a Rendering Type to be used by an Entity Type at render time, it needs to be assigned to it. To assign one or several Rendering Types to an Entity Type, refer to the Entity Type Rendering Attributes.
Rendering Type Context Menu
Right-click on an item int the Rendering Types view to open its context menu:
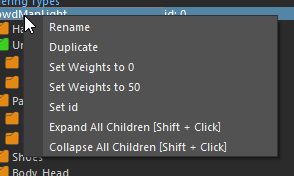
Rendering Type Context Menu
| Rename | Only applies to Rendering Types. Rename the Rendering Type. |
| Duplicate | Only applies to Rendering Types. Duplicate the selected Rendering Type, including all its weights and its child Rendering Types |
| Set weights to 0 | Set the weights of the item to 0 if it's weighted |
| Set weights to 50 | Set the weights of the item to 50 if it's weighted |
| Set id | Only applies to Rendering Types. Changes the id of the Rendering Type. This allows to reorder Rendering Types. |
| Expand All Children [Shift + Click] | Expand all items below the selected one (recursively). Also works when holding the Shift key and clicking on the arrow icon or holding the Shift key and double clicking the item. |
| Collapse All Children [Shift + Click] | Collapse all items below the selected one (recursively). Also works when holding the Shift key and clicking on the arrow icon or holding the Shift key and double clicking the item. |
| Select in Nodal Workspace | Only available if the item is not visible in the Nodal (Main) Workspace. Expands the nodes in the Nodal Workspace up to the selected node and selects it in the Nodal Workspace. |
Item Selection
Selecting an item in the Rendering Types panel will also select it in the Main Workspace. Weights that are overridden by the selected Rendering Type are displayed as green arrows in the Main Workspace.