


Simulation Cache Proxy
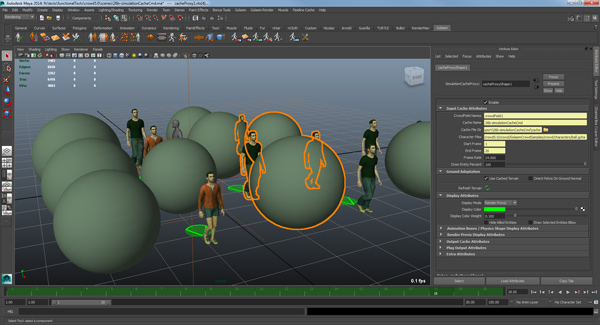
Previsualization of an exported Simulation Cache using the Simulation Cache Proxy.
Creation
A Simulation Cache Proxy node is automatically created when a simulation is exported using the Simulation Exporter Tool.
- Golaem Shelf:

- Golaem Render Menu: Simulation Cache Proxy
- Tool: Simulation Cache Library
- MEL command: glmCrowdSimulationCacheProxyCmd;
- Toggle between Simulation and Cached Replay:
 (for Simulation) /
  (for Cached Replay).
Simulation vs Cached Replay Mode
As soon as a Simulation Cache Proxy node has been created in a scene, Golaem can be toggled between two modes:
- Simulation Mode: this is the default mode when no Simulation Cache Proxy node exists in the scene. It allows to compute the crowd simulation, evaluate behaviors and triggers and export the results as a Simulation Cache.
- Cache Replay Mode: this is the mode which is enabled when a Simulation Cache Proxy node is created in the scene. It allows to preview a previously exported Simulation Cache and can display the layer deformations applied from the Simulation Cache Layout.
There're several ways to check in which mode Golaem is: looking at the Shelf icon and at the Maya timeline:
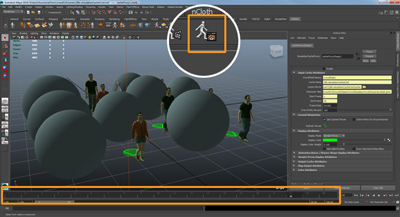
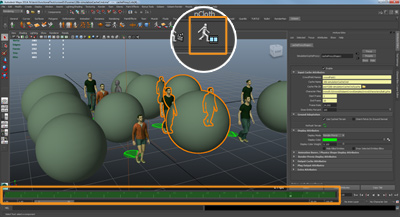
Difference between Simulation Mode (left) and Cache Replay Mode (right)
Configuration
If the Simulation Cache Proxy is created in a scene where a crowd simulation has been exported or from the Simulation Cache Library, most of the following parameters are automatically filled but are editable if needed.
By default, most of the Display and Terrain Attributes are connected to the Simulation Cache Proxy Manager Attributes but are editable per node if needed.
Time Attributes
By default, those attributes are connected to the Simulation Cache Proxy Manager attributes.

| Frame | Current frame to display. Floating frames are not supported in the Simulation Cache Proxy display but are supported at render time. |
Input Cache Attributes
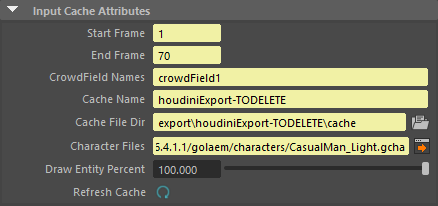
| CrowdField Names | Name of the Crowd Fields to import. Separate the names with ; |
| Cache Name | Name of the Simulation Cache to import |
| Cache File Dir | Directory from where the Simulation Cache files will be imported |
| Character Files | File path to the Golaem Character File (.gcha). Open the Character Files in the Character Maker by clicking on  |
| Start Frame | First frame to import |
| End Frame | Last frame to import |
| Draw Entity percent | Only draw a given percent of entities to save display time. |
| Refresh Cache | Reload the Simulation Cache from their respective files. Also available from the Simulation Cache Proxy Shelf Contextual Menu / right click / Reload Proxy Caches |
Input Layout Attributes
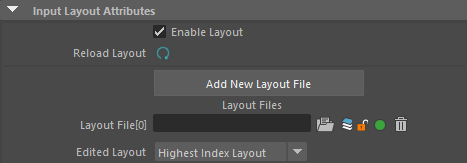
| Enable Layout | If checked, the result of the deformation layers contained in the specified Layout files will be displayed in the viewport for this node. |
| Refresh Layout | Reload all the Layouts from their respective file, and apply them to the node. Beware that unsaved modifications will be lost. Also available from the Simulation Cache Proxy Shelf Contextual Menu / right click / Reload Proxy Layouts |
| Layout File |
Stack of the Layout files (.gscl) to apply to this node. The applied Layout files can be changed using the Simulation Cache Layout Tool. Lower indices are applied first. This stack can be used to handle different retakes, or different edition proposals based on a same master edition etc. Add New Layout File : adds a new Layout File in the stack, with a higher index than existing ones (maya logical index), or 0 if stack is empty
|
| Edited Layout | Choose in the drop-box the layout to edit when transforming cached entities in maya. Defaults to "highest layout index", meaning that the edition will stack on the last layout applied. If the chosen layout is locked, the editing (live or via the nodal editor) will be frozen and read only. |
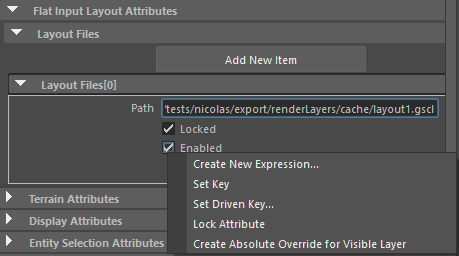
 Open a layout file
 Open this layout in the Simulation Cache Layout
 Lock / unlock the edition of this layout level
 Enable / disable this layout level (if disabled, behaves like a pass through). This attribute can be keyframed by setting a key on the
  Delete this layout file from the stack (does NOT delete the file itself)
Flat Input Layout Attributes
Those attributes replicate the same attributes than above but with a vanilla Maya template in order to make it easier to create Render Layer overrides
Terrain Attributes
By default, those attributes are connected to the Simulation Cache Proxy Manager attributes.
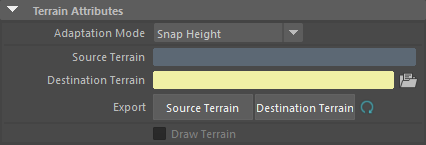
| Adaptation Mode |
Default terrain adaptation mode which is applied to the cached Entities. The available modes are:
Notice that this mode can be changed on a per-character basis using the Ground Adaptation Layer of the Layout Editor. |
| Source Terrain | File path to the terrain geometry stored in the Terrain Locator and which has been used to create the Simulation Cache Files. The Terrain geometry file is automatically exported the first time a simulation is exported in a new directory. This file can be updated for this node using the Export Source Terrain below or for all nodes using the button in the Simulation Cache Proxy Manager |
| Destination Terrain | File path to the terrain geometry on which the Entities will be adapted when using the Simulation Cache Layout Tool. If none is specified, Entities will be adapted to the Source Terrain file. This file can be updated for this node using the Export Destination Terrain below or for all nodes using the button in the Simulation Cache Proxy Manager |
| Export Source Terrain | Exports the Maya geometry meshes used in the simulation as a Source Terrain file. As it exports the meshes connected to the Terrain Locator used by the Crowd Fields on this node, it only works if the simulation is in the same scene. The Terrain is automatically exported in the same directory than the Simulation Cache Files of the node |
| Export Destination Terrain | Exports the currently selected Maya geometry meshes as a Destination Terrain file. The new Terrain File will be used to adapt the edited Entities on. The Terrain is automatically exported in the same directory than the Simulation Cache Files of the node. |
Refresh Terrain  |
Flush the Terrain cache used for adaptation and reload it. Also available from the Simulation Cache Proxy Shelf Contextual Menu / right click / Reload Proxy Terrains |
| Draw Terrain | If checked the Destination Terrain will be displayed in the viewport |
Display Attributes
By default, those attributes are connected to the Simulation Cache Proxy Manager attributes.
See here.
Entity Selection Attributes
These parameters manage the entities that can be selected or not.

| Enable Entities Selection | Enable or disable the entities selection on this whole cacheProxy |
| Selection Disabled Entities | The list of entity IDs that are selection-disabled. It can be updated with the current entity selection via the button |
Output Cache / Layout Attributes
These attributes are used when a the deformations of a Simulation Cache Layout are baked down to a new Simulation Cache:

| Start Frame | First frame to export |
| End Frame | Last frame to export |
| Cache Name | Name of the new Simulation Cache files |
| Cache File Dir | Directory where the new Simulation Cache files will be exported (must be different than the one specified in the Input Cache Attributes) |
| Layout Name | Name of the new Simulation Cache Layout file |
| Layout Dir | Directory where the new Simulation Cache Layout file will be exported |
Frustum Culling Attributes
The Cache proxy entitites can be culled based on a camera frustum. By default, this camera is the one defined in the Crowd Manager Simulation Render Attributes. The enable & frustum margin attributes are linked to this Crowd Manager section by default, but the connections can be broken to get a custom frustum for a specific cache proxy. Note that the Cache Proxy frustum as a frustum margin, but no camera margin (the cylinder around the camera).
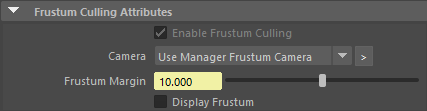
| Enable Frustum Culling | Is the frustum culling enabled, based on below camera |
| Camera | The camera to use (defaults to 'use manager frustum camera') |
| Frustum Margin | The margin around the frustum where entities are still kept |
| Display Frustum | Displays the frustum volume. This is not linked to the Crowd Manager by default, to avoid rendering multiple times the same frustum. |
Advanced Attributes

| Dirmap Rules | Current dirmap rules to relocate Geometry file (.fbx) absolute paths stored in the Character Files (.gcha) at render time. |