


Workflow
The Golaem Crowd workflow is divided into two main parts:
- The pre-production part which consists of preparing your assets for Golaem Crowd (i.e. the character skeleton, geometry, props, shaders and the motion clips). This is represented by the first step of the workflow picture below.
- The production part which consists of using the assets to create a crowd shot. This is represented by the steps 2 to 6 of the workflow picture below.
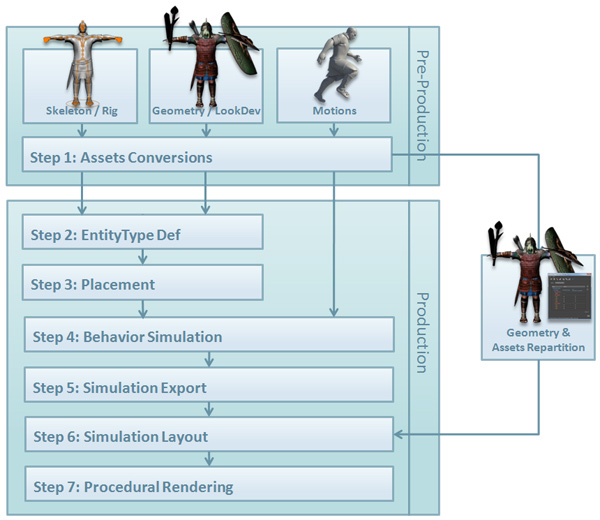
Golaem Crowd Workflow
Due to Maya performance issues, as you can see in the workflow picture above, the actual character geometry will not be used at simulation time: it will be only loaded on-demand at Simulation Layout / rendering time. Although we provide a GPU-accelerated way to preview the character geometries at simulation time. This explains why the simulation needs to be exported before being rendered (step5).
Here is the detail of the six iterative and revertable steps of the Golaem Crowd Workflow:
| Step 1 |
Convert your assets for Golaem Crowd:
|
And for each shot:
| Step 2 | Define and configure the different Entity Types |
| Step 3 | Place the Entities (depending on the Entity Types) |
| Step 4 | Define Behaviors for the Entity Types (making them move, explode, reacting to events, playing animations...) |
| Step 5 | Export the simulation results |
| Step 6 | Edit your simulation results (optional) |
| Step 7 | Render your scene with simulated crowds inside |
For more information about how Entities, Entity Types, Rendering Types & Behaviors interact, please refere here.
You can also follow the Quick Start for an overview of the complete workflow.