


Character Maker Main Concepts
As of August 5th, 2025, Golaem will no longer provide direct support.
All support for Autodesk Golaem will now be handled exclusively through Autodesk support channels and this website will be deactivated soon.
Please bookmark the Autodesk Golaem Support section for any future support needs related to Autodesk Golaem packages.
To be able to do a crowd simulation, three types of assets need to be imported into Golaem Crowd:
- the character skeleton
- the character geometry
- motion clips
- the motion mapping (optional)
Importing those assets can be done with the Character Maker.
Golaem Skeleton
Golaem Crowd uses a dedicated animation engine, which can automatically retarget, blend and mix motions on any kind of morphology. To perform these features, the Golaem animation engine uses its own representation of characters and motions, which should be mapped to the Maya joints representation. The representation of a character is stored in a Golaem Skeleton file (.gcha). It is created using the Character Tab of the Character Maker.
Notice that in the following, we'll use the following words:
- A Bone: a Joint node in Maya is usually referred as a bone in this documentation.
- A Bone Chain: A bone chain is a list of bones that are hierarchically linked to each other, and representing a single "flow". It can be seen as all the bones that you have to go through to link two bones together. These two bones are then referred as the extremities of the bone chain. For instance, in the human skeleton as usually defined with the Maya joint system, we can consider a bone chain running from the clavicle to the wrist: none of the bones in the chain have more than one child, except the wrist which is the last bone of the chain. One can then consider five other bone chains for each finger.
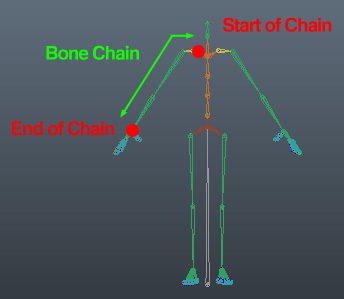
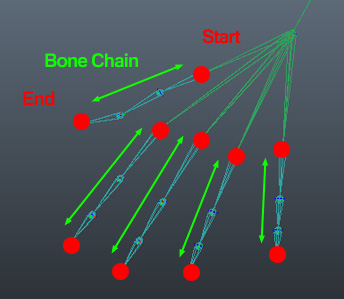
Example of bone chains
Golaem Skeleton Nodes
Unlike Maya skeletons which represents skeletons with only one kind of node (joint), the Golaem Skeleton uses several kind of nodes, each having different properties.
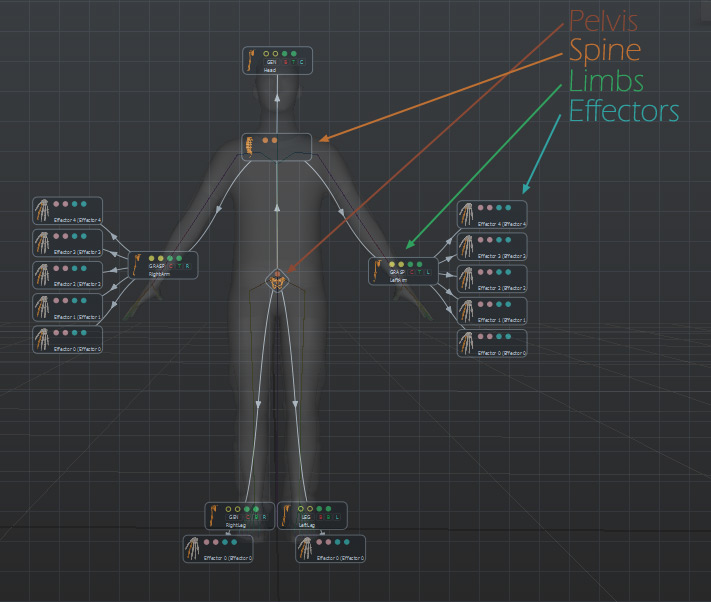
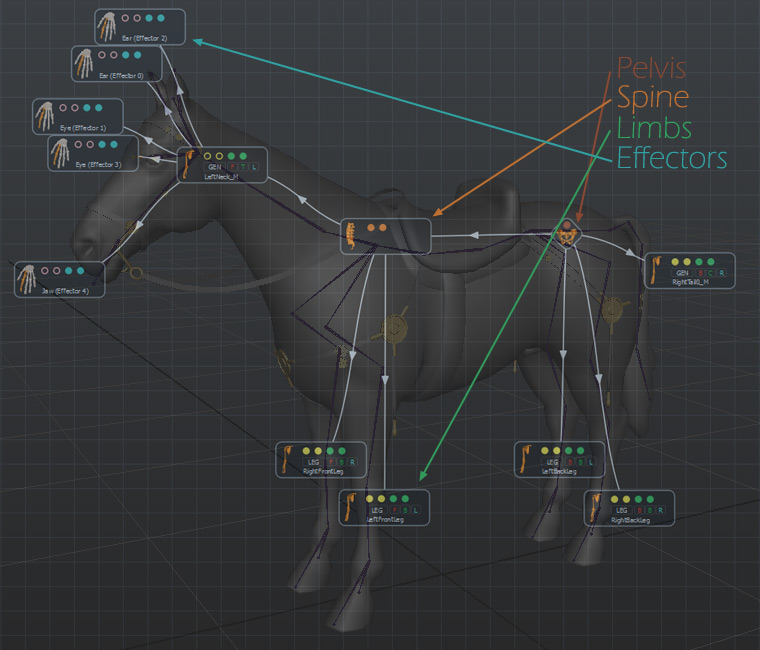
Example of skeleton nodes of a biped and a horse morphology
Pelvis
The pelvis node must be unique per character. It represents the origin of all other nodes and the first animated joint in the user skeleton representation. As stated by its name, it should usually be mapped to the "pelvis" joint of the user skeleton, even if there is a root bone, or ground level bone parent to this one.
Spine
Spine bones should be children to either the Pelvis or another Spine, and should be mapped to a bone chain representing a spine in the user's skeleton.
Spine contains one bone chain.
Limb
Limb bones should be children to either the Pelvis or a Spine (they can't be children of an another limb), and should be mapped to a bone chain representing the limb part without multiple articulations (ie: from the clavicle to the wrist for a human arm, not including the fingers). Limbs contains two bone chains: Extension and Auxiliary bone chains.
Effector
Effector bones should be children to limbs only. Several effectors may be attached at the end of each limb. For instance, in a human representation, the fingers are attached to the arm limb. Effectors contain two bone chains: Extension and Auxiliary Bone chains.
Extension Bone Chain and Auxiliary Bone Chain
Limbs and Effectors are constituted of one bone chain, which can be separated into two parts:
- The Extension Bone chain is the part of a bone chain which is really used to perform the extension action. For instance, on human arm, the arm bone chain goes from the clavicle to the wrist, but only the part going from the shoulder to the wrist is used to extend the arm and make the wrist (end of chain) reach a given position. That is what is called the Extension Bone Chain in Golaem Crowd.
- The Auxiliary Bone chain is the part before the Extension Bone Chain (from the clavicle to the shoulder in the previous sample). It almost does not contributes to the extension of the wrist.
Human morphology Example
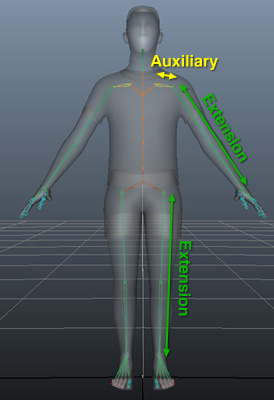
- In the arms, Auxiliary goes from the clavicle to the arm and Extension part goes from arm to wrist
- In the legs, Auxiliary does not exist and Extension goes from the leg to the ankle
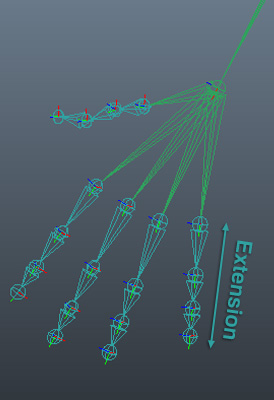
- In human hands, Auxiliary does not exist and Extension goes from the first phalange to the last phalange (If metacarpus are also animated they will have to be set in the Auxiliary part).
Horse morphology Example
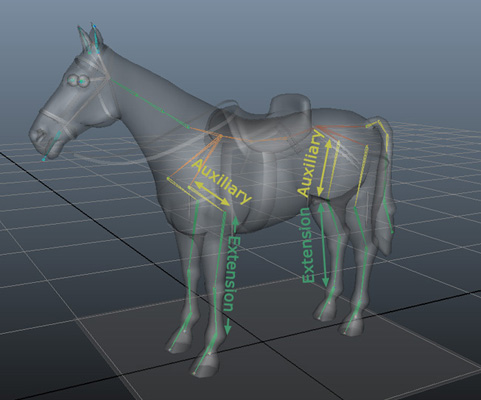
- In the front legs, Auxiliary part goes from the scapula to the humerus, and the Extension part goes from the radius to the metacarpal (cannon) bone.
- In the back legs, Auxiliary part goes from the femur to the tibia (is composed of the femur only) and the Extension part goes from the tibia to the metatarsal (canon) bone
Alien Morphology Example
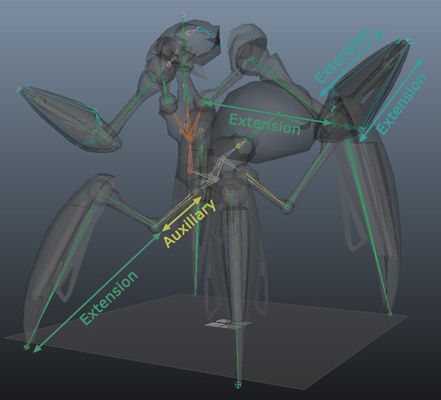
In our alien's legs, the 3 parts of the legs contributes in similar ways to the full extension, so the extension should be containing the 3 bones, and the auxiliary would be empty. But there are two reason to make it another way:
- the Golaem animation engine is optimized for extension or auxiliary bone chains containing 2 articulated bones
- the 3 bones in the legs bend in different ways: the first two bend on one way while the last two bend on the other way. That's something that the Golaem animation engine won't be able to reproduce
So the best thing to do in such cases is to separate the leg into two parts, bending on one way only within each bone chain. Consider also having at least two bones in the extension bone chain when it's possible.
In the arms, Auxiliary part does not exist and Extension part is composed of the only 2 bones in the bone chain. The alien's arms are ended with a gun inside a "holster". The lower part and the upper part of the holster are each composed of 2 articulated bones, which compose the extension part of the Effectors.
IK Normal Plane
The Golaem animation engine does not record the orientation of every joint in the skeleton, but rather store the orientation of the beginning/end of auxiliary/extension bone chains, as well as the distance between the begin and the end of the bone chain. At runtime, the orientation of joints within the bone chain are computed thanks to a simple inverse kinematics algorithm.
To do so, the animation engine needs to know on which local plane to solve the inverse kinematics. In simple terms, the animation engine needs to know in which direction does the elbow bend.
Left: result of an animation converted using the wrong IK normal planes on arms. Look how the replayed motion (green skeleton) diverge from the original motion (mesh)
Right: result of the same animation converted using the correct IK normal planes on arms
IK Planes are configured in the Main Workspace of the Character Maker, by right clicking on the limb and choosing the Edit IK Normal Planes entry.
Here is some documentation about how to check IK.
Bone excluded from IK
The Golaem animation engine does not record the orientation of every joint in the skeleton, but rather store the orientation of the beginning/end of auxiliary/extension bone chains, as well as the distance between the begin and the end of the bone chain. At runtime, the orientation of joints within the bone chain are computed thanks to a simple inverse kinematics algorithm.
But some joints that are present in the skeleton should not be animated this way (for instance: roll bones), and they can be excluded from the IK resolution.
The difference with roll bones correctly excluded from IK or not is shown on the following figures (focus on right arms and right legs):
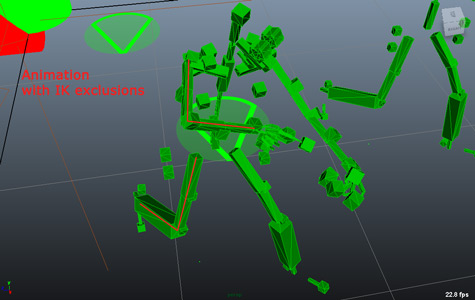 Animation with ik exclusions set to ON on arms and legs |
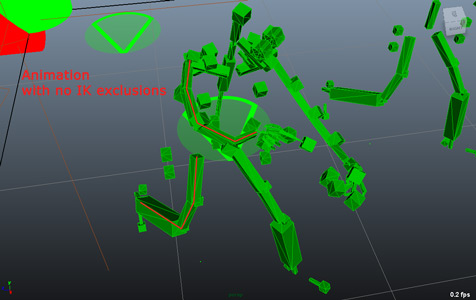 Animation with ik exclusions set to OFF on arms and legs |
Bones IK exclusions are configured in the Main Workspace of the Character Maker, by right clicking on the limb and choosing the Edit Advanced Skeleton entry.
Roll Bone
The Golaem animation engine can handle roll bones. The principle is the same as in HumanIK: some bones can be influenced when the end of bone chain bone is rotated. Here is the difference when roll bones are configured or not:
Animation on wrist without roll bone configuration
Same animation on wrist, but with roll bone configuration (see how the mesh is influenced between wrist and elbow)
Roll bones are configured in the Main Workspace of the Character Maker, by right clicking on the limb and choosing the Edit Roll Bone Parameters entry.
Squash’n Stretch
The Golaem Animation Engine handles Squash’n Stretch animations (according to specific restrictions described in the Motion Prerequisites):
Example of stretched animation on right arm
To do so, Golaem Crowd stores a few extra parameters:
- A set of Squash’n Stretch ratios in the Motion File (e.g. a .gmo file), exactly one per auxiliary/extension bone chain;
- Squash’n Stretch settings in the Character File (e.g. a .gcha file), used:
- When converting a Squash’n Stretch animation into a motion clip (as described in Workflow Overview), in order to determine which bones must be taken into account to compute the Squash’n Stretch ratios (at each frame and for each auxiliary/extension bone chain);
- When replaying a motion clip on a character, in order to determine how to apply and distribute the Squash’n Stretch ratio on the target character (at each frame and for each auxiliary/extension bone chain).
Right arm stretched input animation leading to different replay configurations depending on Squash’n Stretch settings
Squash’n Stretch is configured in the Main Workspace of the Character Maker, by right clicking on a limb and choosing the Edit Squash’n Stretch Parameters entry.
Blend Shapes
Golaem Crowd's animation engine handles blend shapes the same way it handles skeletons. Character files and Motion files store blend shape configurations, and blend shape animation is stored in Motion files. In order to play a blend shape animation on any character blend shapes also require motion mapping information.
There are two main concepts regarding blend shapes:
Blend Shape Groups
Blend Shape Groups act like channels on the skeleton. A Blend Shape Group contains any number of Blend Shapes (see below) and is equivalent to a blend shape node in Maya.
Blend Shapes
A Blend Shape is equivalent to a weight on a blend shape node in Maya. Blend Shape values define how the character's geometry is deformed and they are stored in Motion files.
Body Parts
Each joint that is within a bone chains in the Skeleton Mapping Nodes has an equivalent Body Part. The Body Parts defines the physics properties of each joint:
- if it's physicalized or not (ie. if it is simulated in the Physics engine or not). Note that the more joint are physicalized, the more time consuming it is. By default, only the pelvis, spines, and the extension part of limbs are physicalized ;
- the shape, dimensions and mass of the physicalized body ;
- the joint limits ;
- other advanced physics properties of joints and rigid bodies.
Body Parts are configured in the Skeleton Tab of the Character Maker, by right clicking on the joint and choosing the Edit Physics Properties entry. They are used only if a Physicalize Behavior is present in the behavior of the entity.
Motion Mapping
To replay a motion on a particular skeleton (e.g. to process motion retargeting), the Golaem animation engine plays the motion channel by channel rather than joint by joint. This allows the replay's skeleton to be quite different from the motion's skeleton, but the motion to be quite similar. The Golaem Motion Mapping is a (.gmm) file. It is made with the Motion Mapping Tab of the Character Maker.
Limb Channel
To be able to replay a motion on any kind of morphology, the Golaem animation engine relies on some abstractions of the skeleton rather than storing/playing the animations joint by joint. The Golaem animation engine stores the animation as a set of different channels, each channel storing the part of the motion on a Limb and all its Effectors. There is a channel for every Limb, and each Limb belongs to one single channel. Each channel is given the name of the Limb it contains, as well as an id that is used to access the channel from the Motion Mapping Tab and some behaviors.
The channel contains all the Skeleton Mapping Nodes and the containing bone chains of the Limb and all its Effectors.
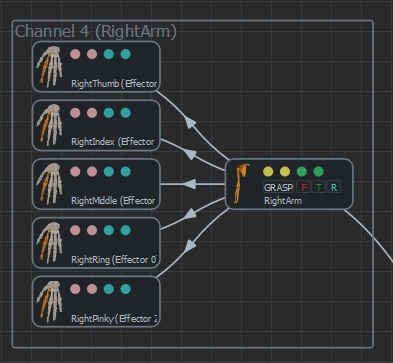
Sample of a channel in a biped morphology. This one is named RightArm (after the limb's name) and has an id of 4
Channels are automatically configured each time a new limb is added. They are shown only when the Motion Mapping Tab of the Character Maker is selected.
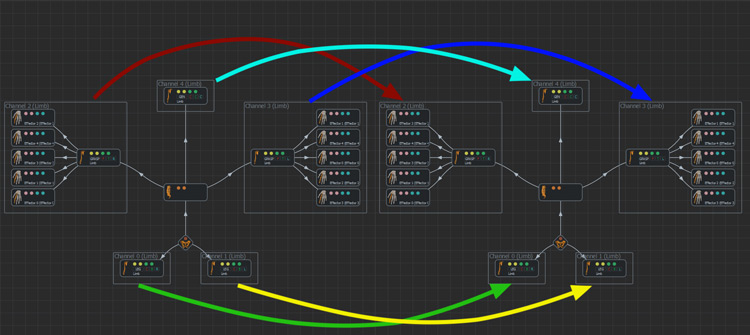
Example of mapping a human motion on another human skeleton
This also allows playing motions on skeletons with a different number of limbs than the original skeleton. For instance a biped motion could be replayed on a skeleton with 2 legs and 4 arms: the upper arms and lower arms would just have to replay the same animation channels.
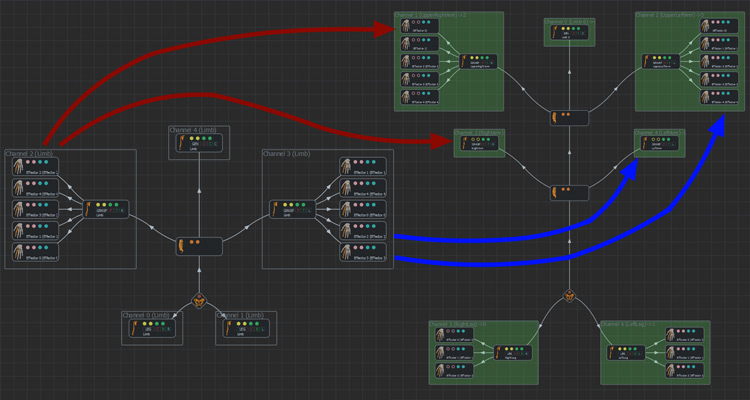
Example of mapping a human motion on a 4 arm biped.
Each arm channel from the human motion is played twice on the 4 arm biped: once on the lower arm and a second time on the upper arm
And here is the result of such a Motion Mapping:
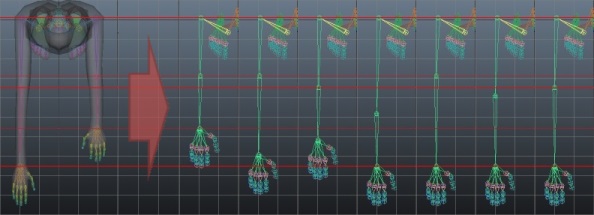
Result of the Motion Mapping of a human motion on a 4 arms biped (original Motion shown on left)
Replay Mode
When playing an animation channel on the entity's skeleton, there are two modes: the Rest Relative Mode and the Absolute Mode. If the skeletons are similar, both will play the motion in the same way. But when the skeletons are different, like for instance a difference in the arm's orientation at rest:
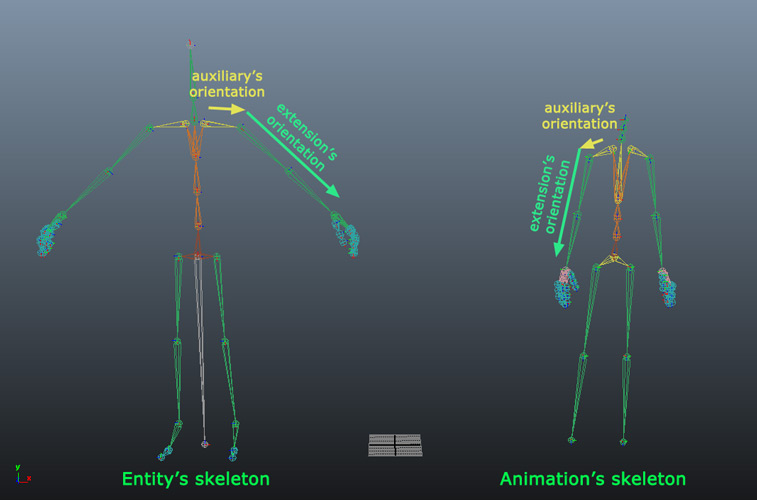
Slightly different arm's orientation on the entity's skeleton and the animation's skeleton
Playing the arm's animation from the right skeleton can mean two different things: either it's important to keep the base skeleton's orientation, and just add the animation on top of it, or it's more important to keep the absolute orientation of the arm in the animation whatever the base orientation was, as shown in the following illustration:
Replaying the same motion with different replay modes on arms:
- rest relative mode on the blue character
- absolute mode on the green character
- in Absolute Mode for all extensions for any kind of limbs except for the head
- in Rest Relative mode for all auxiliary for any kind of limbs, and also for the head's extension