


Rendering Workflow
As of August 5th, 2025, Golaem will no longer provide direct support.
All support for Autodesk Golaem will now be handled exclusively through Autodesk support channels and this website will be deactivated soon.
Please bookmark the Autodesk Golaem Support section for any future support needs related to Autodesk Golaem packages.
Once a simulation of Crowd Entities has been exported in a Simulation Cache, it can be rendered and the Crowd simulation nodes are not needed anymore. It is then required to add a new node in the scene called the Crowd Render Proxy, which tells the rendering engine that there is a new element to render. The following chapters illustrate the rendering workflow, where does the data come from and how information are processed to generate the rendered Entities.
Golaem Character
The Golaem Character defines the appearance of characters when rendering (see the Character Maker Geometry Tab). Two types of file are needed:
- a Golaem Character File (.gcha) which contains the Assets Groups, Mesh Assets, Shader Names, Assets Bounding Box and Rendering Types used to generate the final appearance of characters at render time. The Golaem Character File also contains the filepath to the relative Geometry File.
- a Character Geometry File (.gcg) which contains the skinned geometry of the Golaem Character, including its normals and UVs.
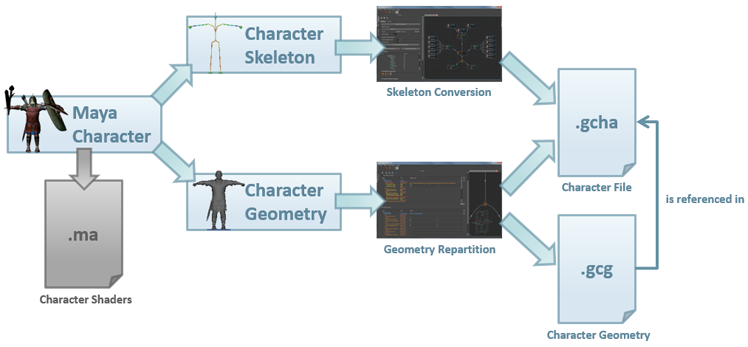
The Character Maker exports two file types: a Golaem Character File and a Character Geometry File (referenced in the Character File)
Simulation Export
The Simulation Exporter is used to export the Simulation Results. It exports two types of file:
- Simulation Cache Files per simulation (.gscs) which contains the global data about the simulation and the correspondence between simulated Entities and Rendering Types. There is only one file per simulation.
- Simulation Cache Files per frame (.gscf) which contain the result of the simulation (positions, orientations, scales & postures of each Entity). It generates one Cache File per frame.
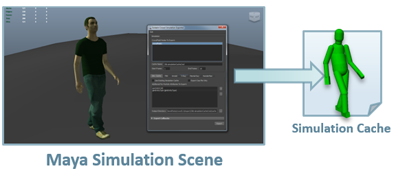
The Simulation Exporter exports Simulation Cache Files per simulation and per frame
Simulation Layout
The Simulation Layout is used to edit the results of a Simulation Cache. It exports two types of file:
- a Simulation Cache Layout File (.gscl) which contains the different deformation layers and their values.
- a Cached Terrain Geometry File (.fbx or .gtg) which will be used to snap Entities to the ground when deformation layers are applied (translate, orient, expand...)
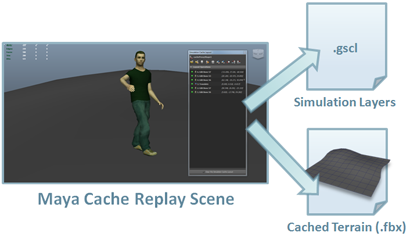
The Simulation Layout exports two types of file: a Simulation Cache Layout file and a Cached Terrain Geometry File
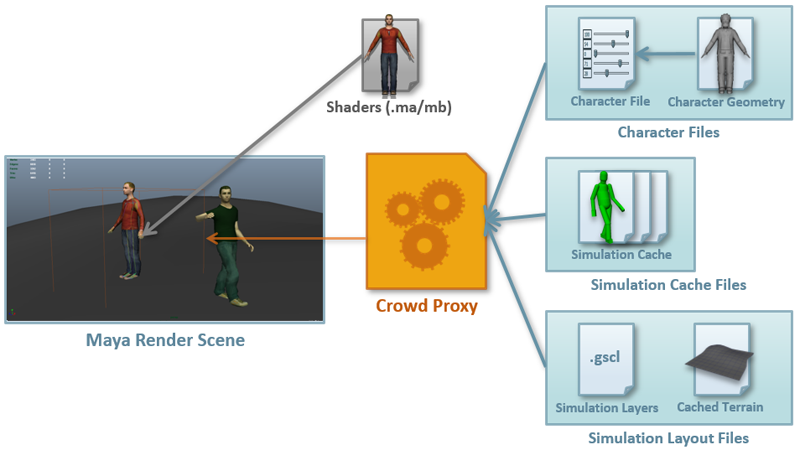
Rendering
The Crowd Proxy parameters contain the files exported from the Character Maker, the Simulation Exporter and the Simulation Layout.
Thanks to this modular approach, it is possible to modify, edit or overwrite either the Simulation Cache Files, Simulation Layout File, the Geometry Files or the Character File at any time without impacting anything else than the render (e.g. you can change the repartition of an Asset Group in the Golaem Character and get a different render without having to re-export the simulation).
When a render is started, the Crowd Proxy processes the files as follows:
- The Cache File of the current frame is opened and the position / scale of each Entities is read.
- The Simulation Layout File of the simulation is opened and the deformation layers are applied to the opened Cache File (in a non destructive way)
- The Rendering Type of each Entity is read from the Simulation Cache Per Simulation File and from the Layout Files.
- The Character File is opened and the Bounding Box size of each Entity is read.
- The Bounding Boxes of each Entity is placed and scaled in the scene according to the information of the Cache File.
Each time a Bounding Box is hit by a render ray:
- The GCG Geometry File of the hit Entity is opened.
- The Assets of this Entity (e.g. which mesh will be used for the haircut, tshirt...) are computed and the unnecessary Assets are deleted from the Geometry.
- The posture stored in the Cache File (orientation of each bone) is applied to the Geometry skeleton.
- The Golaem Engine computes the skinning weight of the Geometry.
- The Proxy converts the geometry information stored in the Golaem Engine (vertices, faces, UVS, normals) into the Rendering Engine language.
- The Proxy attached the name of the Shaders (from the Character File) and some Shader Parameters to the new Geometry.
- The Rendering Engine does its magic.
IMPORTANT: It is important to notice that shaders are read from the Maya Scene and NOT from the linked Geometry File. Thus, Shaders should be imported in the scene (from a lookDev Maya scene for example) and applied on a not-hidden geometry (so they will be converted by Maya into the Rendering Engine language at render time).
To be able to render crowd on a Render Farm, refer here.