


Channel Operator Navigation
As of August 5th, 2025, Golaem will no longer provide direct support.
All support for Autodesk Golaem will now be handled exclusively through Autodesk support channels and this website will be deactivated soon.
Please bookmark the Autodesk Golaem Support section for any future support needs related to Autodesk Golaem packages.
- moving entities
- slowing down in front of obstacles thanks to sensors
- turning to avoid obstacles
- adding a locomotion
Here is how our scratch scene looks like with nothing else than an environment and a population (Entity Type, Population Tool and a NavMesh. Please see the Quick Start Tutorial if needed):
Our environment with stairs, slopes and a kind of cylinders forest, populated with characters (in orange)
Moving entities
The first step in this tutorial is to add some Channel Operator to move our entities in the environment.
1. Open the Behavior Editor, and add a Channel Operator Behavior  on the Entity Type
2. Select the Channel Operator Behavior and Add a New Output Channel
3. Select the newly created output channel by clicking on the right arrow button

A click on this button will select the corresponding Output Channel Operator
4. Configure the Output Channel to output the Entity Position
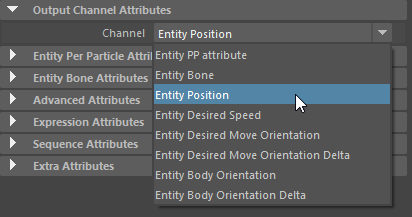
Output the entity position
5. For demonstration purposes, add a ChOpInput as an Input (click on the  icon in the Channel Operators Graph Tool of the output channel attributes), and configure its Expression to a position in the environment

Channel Operator Input configured to input a (0,0,0) vector3
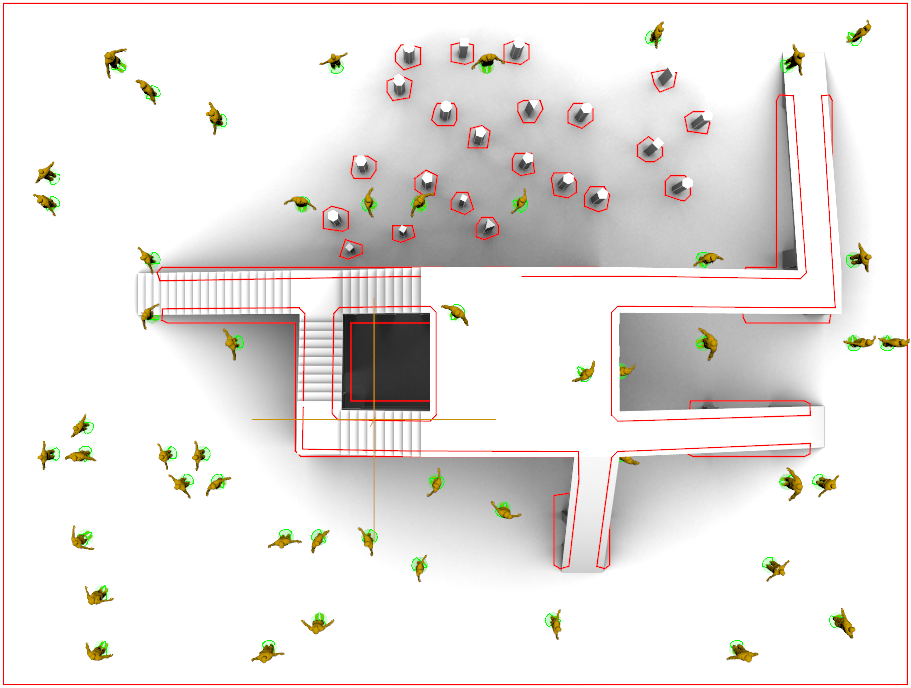
Now if you run the simulation at this step, you should see all entities teleported to the position that was entered in the Chanel Operator Input (in the top left corner):
Positions of our Entities are all set to the same point in the environment
That's obviously not the point of this tutorial, but this demonstrates how Channel Operators do work.
Now that we know how to teleport entities, let's try to make them move in a smooth way instead of teleporting them all at the same place.
6. First, delete the ChOpInput created in step 5, rename the ChOpOutput node into "outputPosition", and open the Node Editor showing inputs/outputs of the outputPosition node to see the graph of channel operators.
What we need to build to get smooth trajectories (regardless of avoidance) is a graph of channel operators that:
- get the current position of the entity
- compute a delta position to add that depends on the current orientation of the entity
- output it to the entity position.
Here is what the graph of channel operators built in the following steps looks like in the Node editor:
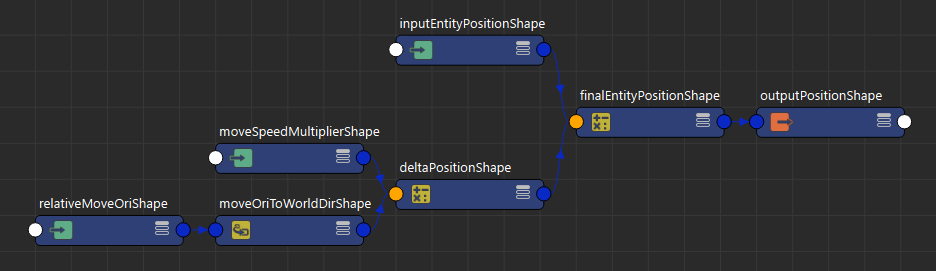
Graph of channel operators that simply moves entities in front of them
7. Select the outputPosition node and add a previous ChOpOperation 
This stage will add the entity position with the delta position to give the final entity position, rename it into "finalEntityPosition"
Let the operator configured to addition (+)
8. Select the finalEntityPosition node and add a previous ChOpInput
This stage will input the current entity position into the graph, rename it into "inputEntityPosition"
Configure the Expression to use the Channel "this.position"

9. Select the finalEntityPosition node again, and add another previous ChOpOperation
This stage will compute the delta position to add, rename it into "deltaPosition"
Configure the operator to a multiplication (x)
10. Select the "deltaPosition" node, and add a previous ChOpConverter 
This stage will convert the current entity orientation (angle in °) into a world direction (vector3), rename it into "moveOriToWorldDir"
Configure the convert mode to a Body Angle To World Direction
11. Select the "moveOriToWorldDir" node, and add a previous ChOpInput
This stage will input the local delta orientation in which moving the entity, rename it into "relativeMoveOri"
Configure the Expression to "0" to move the entity in front of them, or try different values to move them side or backward
10. Select the "deltaPosition" node again, and add a previous ChOpInput
This stage will set the speed at which moving the entity, rename it into "moveSpeedMultiplier"
Configure the Expression to "0.03", or try different values to change the speed of the entity
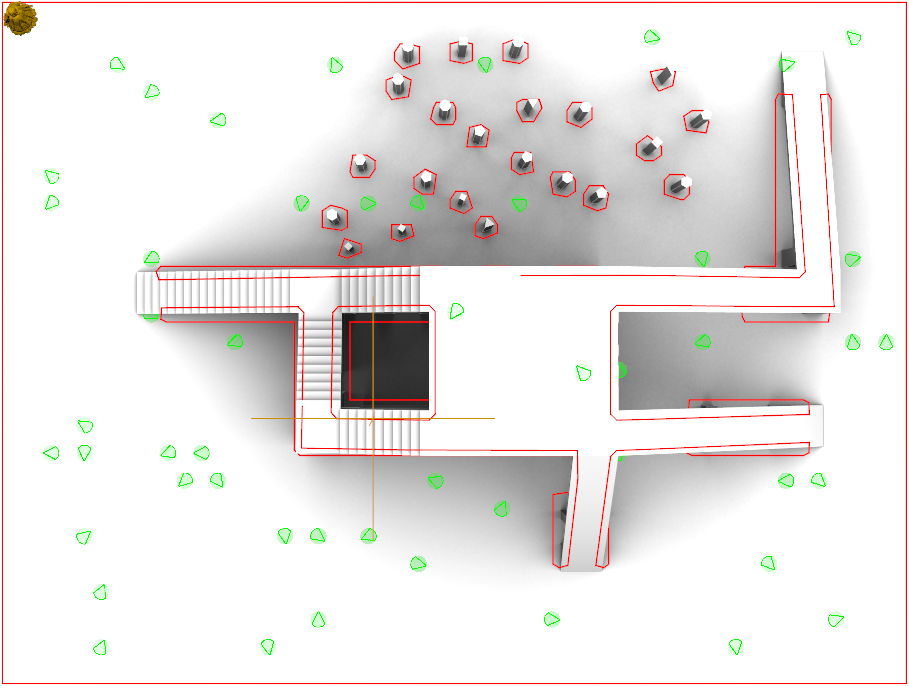
Now all entities should move straight forward, whatever their initial orientation was:

Simulation of channel operators that simply moves entities in front of them
Slowing down in front of obstacles thanks to sensors
Entities are moving fine, but they don't take the environment into account. Let's add some sensors to them.
Adding sensors
1. Create a Maya cylinder polygon, and set its radius to the distance at which you want your entities to be aware of obstacles (let's say 5 maya units)
2. Select the cylinder and create a Sensor Locator by clicking on the  icon in the Golaem Shelf
This creates a Sensor Locator that allows entities to perceive the obstacles in the simulation. Obstacles can be either entities, or navigation obstacles (NavMesh file loaded in the Terrain locator).
Select the cylinder again, and create another Sensor Locator. One will be configured to detect entities while the other will be configured to detect navigation obstacles (see Detection Type attribute):
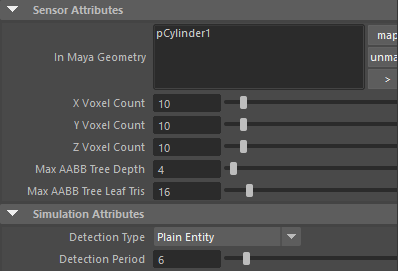

Sensor Locators to detect entities and navigation obstacles
3. Sensor Locator needs to be activated on the entities. This is done by adding an Activate Sensor Behavior for each sensor:
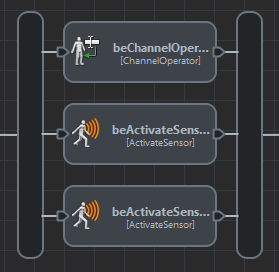
Activate Sensor behaviors in parallel with the Channel Operator
Configure one of the Activate Sensor behaviors to activate the first sensor, and the other to activate the second sensor.
If you run the simulation at this point and select an entity, you should be able to see both the sensors in action in the Visual Feedback:
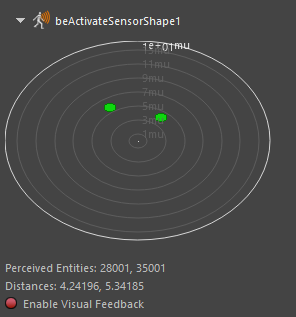
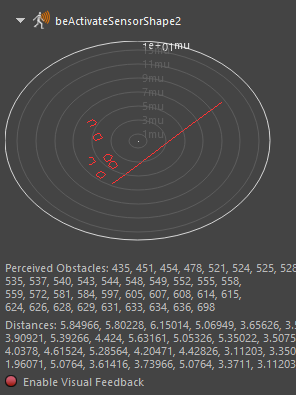
Two sensors in action in the Visual Feedback, displaying perceived entities (left) and navigation obstacles (right)
Using Sensors
The first part of the tutorial detailed how to create and connect new Channel Operators. This part will focus on the graph itself and the configuration of each channel operator.
To allow the entities to slow down, the moveSpeedMultiplier node will be removed and replaced by a subgraph of nodes that will compute the desired speed for the entity.
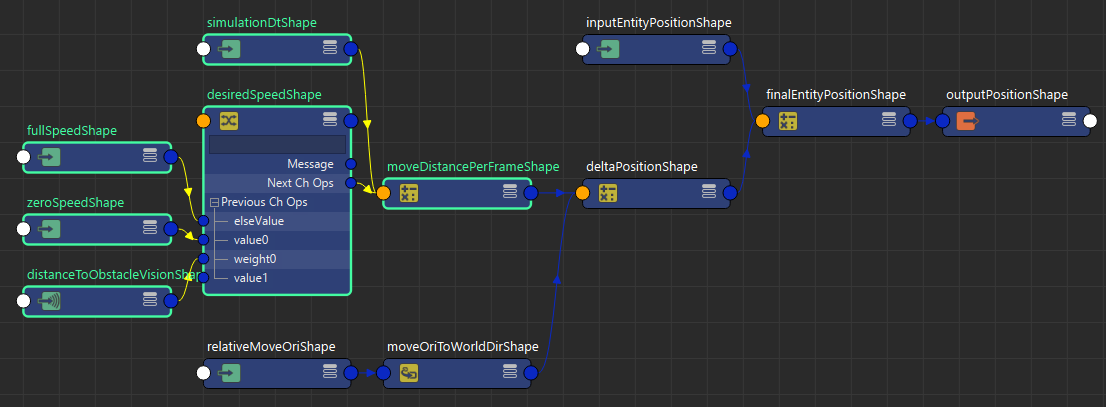
Graph of Channel Cperators that moves entities in front of them and slow down in front of obstacles
New Channel Operator nodes are highlighted in green.
1. In the above graph, the fullSpeed (the expression is configured to 5) and zeroSpeed (expression configured to 0) are interpolated using a Multiplexer Channel Operator  to obtain the desiredSpeed (configured as interpolator default, be careful of the indices of the previous channel operators plugs, as each input has a different meaning).
2. The weight that interpolate between the full speed and 0 comes from a Sensor Input Channel Operator  . The Sensor Input Channel Operator is a specific Channel Operator node that allows to input values from the Sensors into the graph of channel operator. In this case, we need the Sensor Input node to input a value that varies from 0 to 1 depending on the distance of perceived obstacles in front of the entity.
For example, we can configure it with the following parameters:
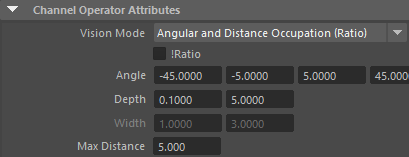
Parameters of a Sensor Input channel operator that detect when an obstacle is perceived in front of the entity
Such a sensor will check for obstacles:
- from 0.1mu (distance parameter A) between -45° and 45° (Angular fuzz parameters A and D)
- up to a distance of 5mu (distance parameter D) between -5° and 5°(Angular fuzz parameters B and C)
It looks like the following screenshot when using the Visual Feedback:
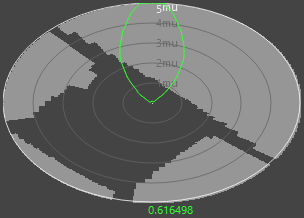
Sensor Input Channel Operator Visual feedback
The returned value is the ratio of obstacles / free space in the fuzz vision space (in green). It will return 0 if no obstacles are in this zone, up to 1 when the zone is completely filled by obstacles
3. Finally, the desired speed is multiplied by the simulation dt (simulationDt, with an Expression set to 0.04, which is approximately the duration of one frame à 24fps) to obtain the distance to move in a single frame (moveDistancePerFrame , configured with the multiply operator).
The simulation should now run like this:
Simulation of channel operators that moves entities in front of them and slow down in front of obstacles
Turning to Avoid Obstacles
Stopping in front of obstacles is fine, but wouldn't it be better to avoid them instead ? Here is the graph of channel operators that allows that.
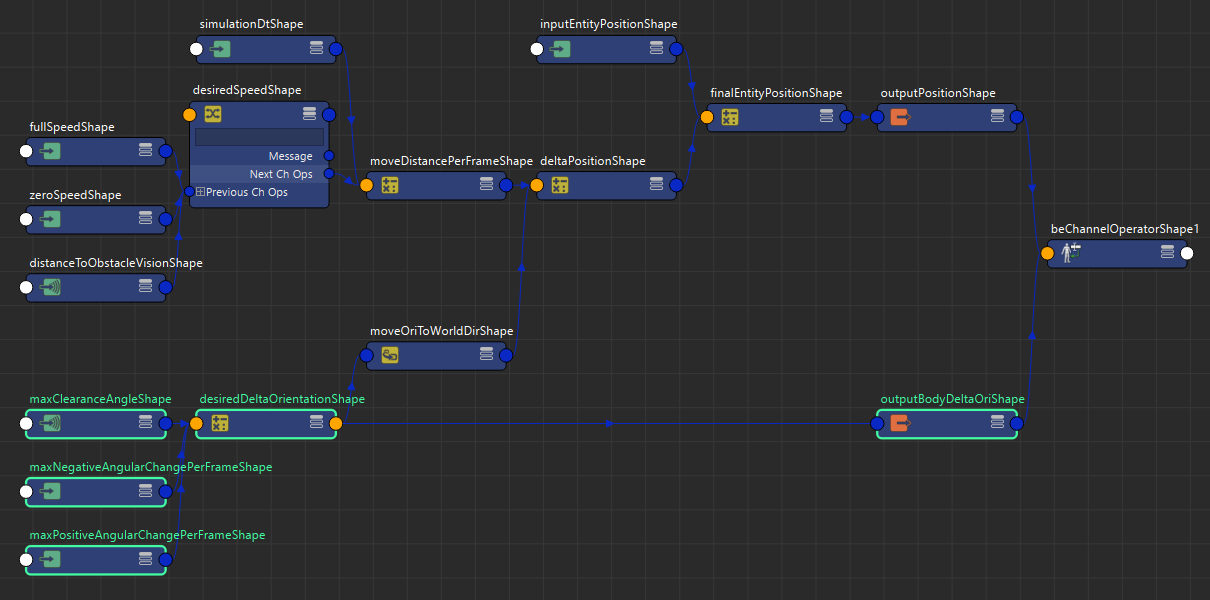
Graph of channel operators that moves entities in the maximum clearance direction and slow them down in front of obstacles
New Channel Operator nodes are highlighted
1. Add a "maxClearanceAngle" ChOpSensorInput configured in Maximum Clearance Angle mode. The default values for the angle and depth should be fine, but let's fine tune them to offer the entities an enhanced vision on the right side
![]()
ChOpSensorInput configured in maximum clearance angle with higher vision angle on the right side
2. To avoid fast turning rates, the sensor input is used trough a clamp operation ("desiredDeltaOrientationShape" configured with a clamp operator) that limit the delta orientation per frame to something reasonable. The "maxNegativeAngularChangePerFrame" is configured to -5, and the "maxPositiveAngularChangePerFrame" is configured to 5.
The filtered output is then connected to the existing moveOriToWorldDir instead of the relativeMoveOri that was just deleted.
3. The body orientation of the entity should also be modified to reflect the entity movement direction. Select the Channel Operator behavior again and add a new output  . Configure it to Entity Body Orientation Delta, and rename it "outputBodyDeltaOri"
4. Connect the desiredDeltaOrientationShape.nextChOps to the outputBodyDeltaOriShape.previousChOps[0]
Now the simulation should looks like that:
Simulation of channel operators that moves entities in the maximum clearance direction and slow them down in front of obstacles
Adding a Locomotion behavior
Ok, the navigation is working, but what about an animation on top o fit ?
The best way to do it is trough a Locomotion Behavior, but as the Locomotion Behavior will handle the entity's position and orientation, part of the channel operators in the graph become useless.
1. Select the following Channel Operators and delete them:
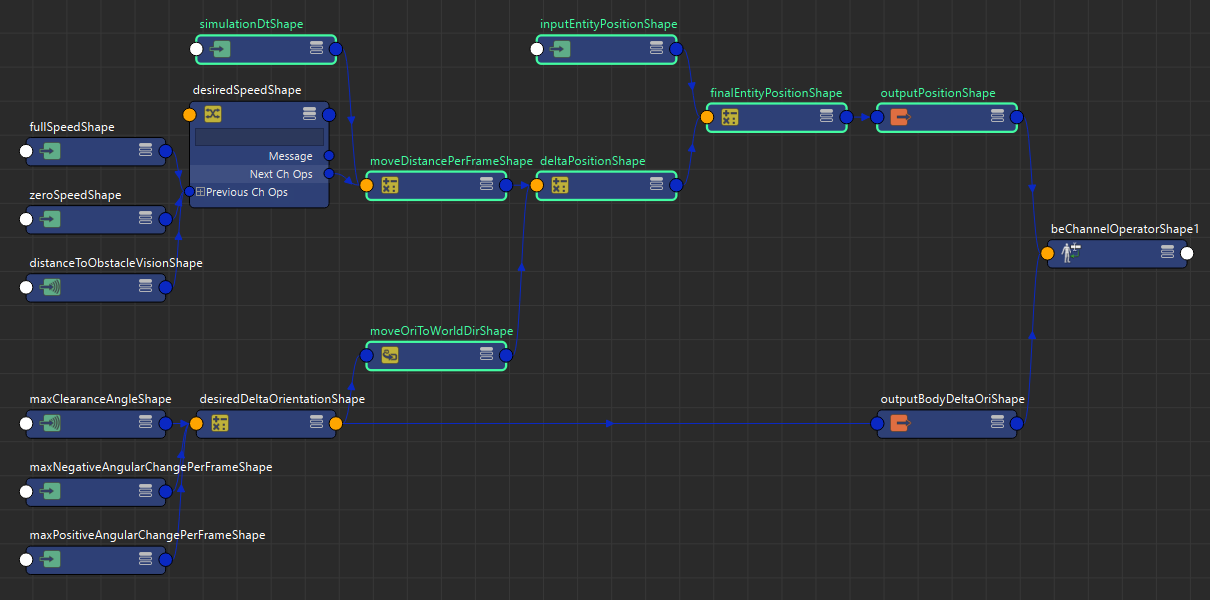
Nodes that will be replaced by a locomotion behavior
2. Now select the "outputBodyDeltaOri" and change its configuration to Entity Desired Move Orientation Delta. The Locomotion Behavior will read this attribute, and compute the blend of motions that should reach the desired move orientation. Rename the node into "outputDesiredMoveDeltaOri"
3. Now select the Channel Operator behavior again and add a new output . Configure it to Entity Desired Speed, and rename it "outputDesiredSpeed"
4. The desired speed is already computed thanks to channel operators previously made, so there is nothing else to do than connecting it.
Connect the desiredSpeedShape.nextChOps plug to outputDesiredSpeedShape.previousCHOps[0]
The graph of channel operators should now looks like that:
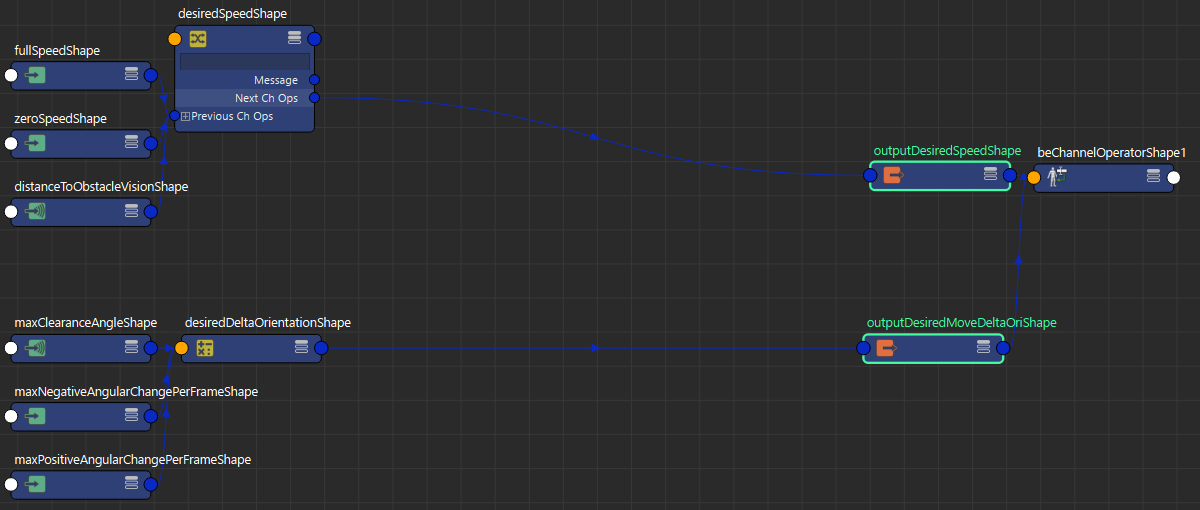
Graph of channel operators that set desired speed and orientation for a Locomotion Behavior
New Channel Operator nodes are highlighted
5. The next thing to handle is the Locomotion Behavior.
Open the Behavior Editor and add a Locomotion Behavior to the Entity (and configure its motions correctly):
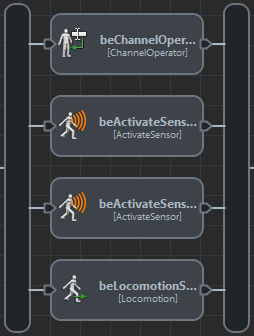
Behavior graph with the ChannelOperator, both ActivateSensor and the Locomotion Behaviors
By default, the Locomotion Behavior would follow the Entity's position, but as only the desired speed and move orientation where set in the Channel Operators, it needs to be set in a different mode. Open the Locomotion Attributes of the Behavior and set the Control Mode to Direct Mode controlled by animation
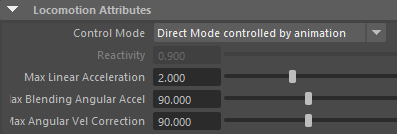
Locomotion configured in Direct Mode controlled by animation
Now the simulation should have all entities moving with an animation, and avoiding each other and slowing down when they face an obstacle:
Simulation with channel operators that set desired speed and orientation for a Locomotion Behavior