


Defining Geometry
As of August 5th, 2025, Golaem will no longer provide direct support.
All support for Autodesk Golaem will now be handled exclusively through Autodesk support channels and this website will be deactivated soon.
Please bookmark the Autodesk Golaem Support section for any future support needs related to Autodesk Golaem packages.
Golaem Crowd allows to list all the meshes and shaders of a Character and define the rules about how those meshes will be distributed amongst the Entities. It consists of two steps:
- Defining the available Character assets (meshes and shaders)
- Creating the Rendering Types, i.e. the repartition rules of the meshes. Once defined, Rendering Types can be assigned to Entity Types.
This geometry definition is done using the Geometry Tab of the Character Maker.
Defining the Character Assets
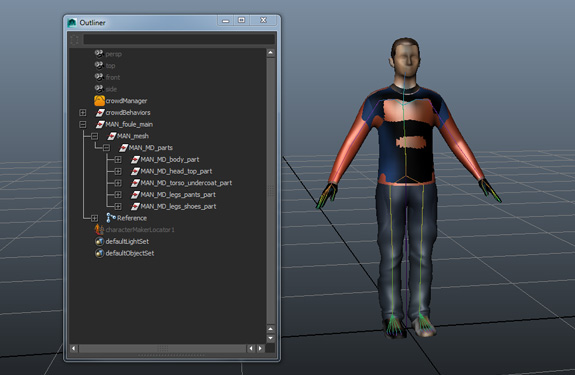
In the example below, we will use the /golaem/shaders/CMO-man_golaem_lightMR.ma scene from the Character Pack. To be able to define the Geometry of the Character in the Character Maker, first you need to convert its skeleton.
Samples Pack Character
Importing Assets from Maya
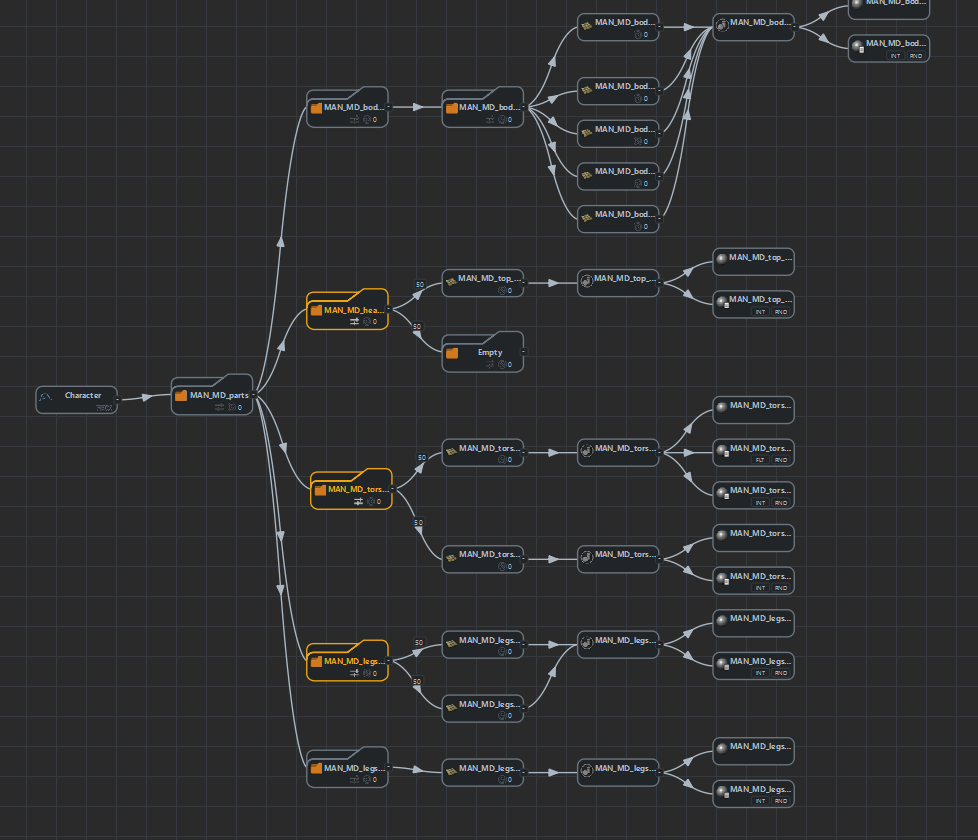
The Character Maker is able to import the Geometry Assets of a Character according to its mesh hierarchy in Maya. To import all the assets, select the MAN_MD_parts transform and click on the Import Geometry button  . Each transform will be imported as an Asset Group node, and each mesh as a Mesh Asset node. The shading groups and shaders will also be imported as Shading Group nodes and Shader Asset nodes. Any connected user data shaders are imported as Shader Attribute nodes.
Importing Geometry Assets from Maya
It's possible to reorganize the imported assets by connecting them differently. Keep in mind that each Mesh Asset represents a mesh of the Character, thus a mesh with the same name must be present in the Character's geometry file. The Maya scene being rendered must contain shading groups or shaders (depending on the renderer) with the same names as the Shading Group nodes and Shader Asset nodes in the Character File. Also the Shader Attribute nodes are usually parameters in user data shaders, thus they must have a match in the Maya scene at render time.
Asset Group Weights
If an Asset Group is weighted, only one of its child nodes will be chosen at render time according to the Asset Group's weights, otherwise all of its child nodes will be chosen. This allows to create visual diversity through different combinations of meshes. To enable weights on an Asset Group node, click on the  icon on the node or check the Weighted checkbox in the Asset Group's properties.
In the example above we added an empty Asset Group manually (drag and drop from the Asset Nodes view or using the TAB key in the main workspace, as explained here) and linked it to the MAN_MD_head_top_part node, and set the MAN_MD_head_top_part, MAN_MD_torso_undercoat_part and MAN_MD_legs_pants_part Asset Groups as weighted.
Weighted Asset Groups
In the example above, each character will have:
- All the meshes (all body parts) in the MAN_MD_body_part Asset Group
- Either the hair mesh (MAN_MD_top_hair_std) or no mesh at all (Empty Asset Group) in the MAN_MD_head_top_part Asset Group
- Either the t-shirt mesh (MAN_MD_torso_tshirt_std) or the sweatshirt mesh (MAN_MD_torso_sweatshirt_standard) in the MAN_MD_torso_undercoat_part Asset Group
- Either the trousers mesh (MAN_MD_legs_pants_longFolds) or the shorts mesh (MAN_MD_legs_pants_short) in the MAN_MD_legs_pants_part Asset Group
- The shoes mesh (MAN_MD_legs_shoes_sport_1) in the MAN_MD_legs_shoes_part Asset Group
Exporting the Geometry File
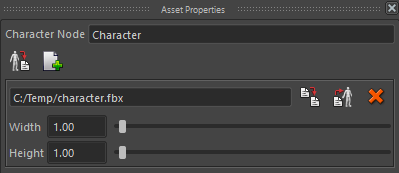
The Character Node references all the Geometry Files of the Character (.fbx or .gcg files). In most cases only one Geometry File is needed. The Geometry File is used to stores the meshes defined in the Character File as well as the way they are skinned on the simulated skeleton. See Rendering Workflow for more information.
To export a Geometry File for this Character, select the Character Node and press the Export Geometry File  button in the Asset Properties panel.
A window will appear, to ask for the file format :
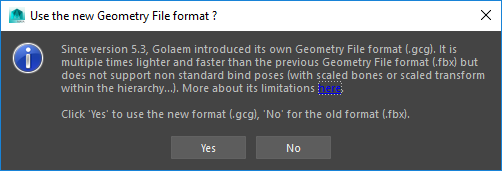
You can learn more about gcg format restrictions by clicking here. Once you have done your choice, the tool will export all the meshes matching the Mesh Asset nodes in the main workspace to a Fbx or Gcg file which will be listed in the Asset Properties panel.
Geometry File
When the Geometry File is added, a Bounding Box is automatically attached and centered on the root bone defined in the Skeleton Tab. This bounding box is used by the renderer in order to check if it should call the Golaem Crowd procedural to render a character or not (more here). Bounding Box boundaries should be adapted to the character geometry and scale (taking into account the potential motions of the characters, e.g. if the character is a human and can raise its arms, a 1 meter margin should be added on top of the head). Change the Width and Height of the created Geometry File (you can check their value in the viewport).

Geometry File bounding box in the viewport
If the path to the geometry file of one of the Characters has changed, it can be relocated with the Relocate Geometry File button  .
.
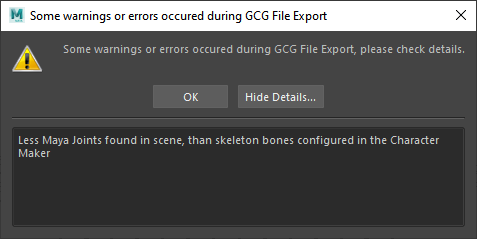
IMPORTANT: If new Mesh Asset nodes are added or meshes are edited in Maya (shape, skinning, name...), the corresponding Geometry Files must be reexported.
While exporting a GCG file, any error or warning during export will be reported in a message box :
Creating Rendering Types
Defining Rendering Types
Rendering Types determine how the Geometry Assets are distributed to Golaem Characters, thus defining their appearance and creating visual diversity. Rendering Types allow to define populations or groups of entities by adjusting weights on Geometry Assets, describing the likeliness of their occurrence.
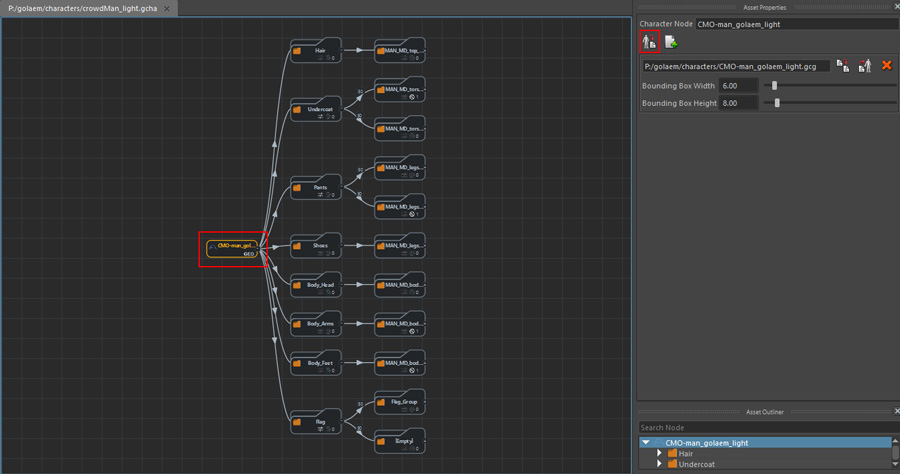
To create a new Rendering Type, click on the  button in the Rendering Types panel (Geometry Tab). You will be prompted to enter the name of the Rendering Type to create. In the example below we created two Rendering Types: crowdMan and crowdManSummer. Each Rendering Type displays all the Asset Groups in the Character. Weighted Asset Groups are displayed with their child nodes and sliders for their weights. Each weight can be set between 0 and 100.
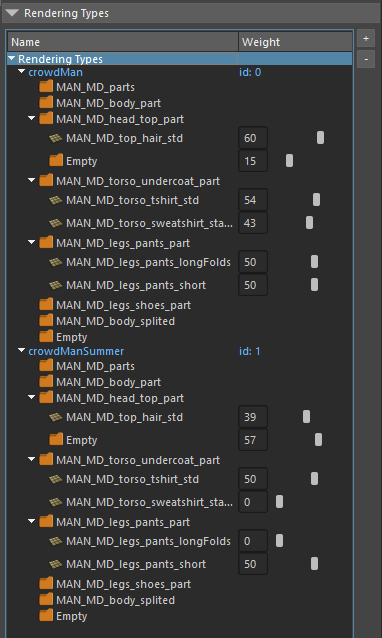
Rendering Types view
In the example above:
- In the crowdMan Rendering Type there will be 4 time more characters with hair than bald characters. There will be slightly more characters with t-shirts than with sweatshirts. Half the characters will have long trousers, the other half will have shorts.
- In the crowdManSummer Rendering Type there will be more bald characters than characters with hair. All characters will wear a t-shirt and shorts.
Saving The Character File
The Character File is now ready to be saved by clicking on the Save button  . The Character File can now be used in a Crowd Simulation.
Assign a Rendering Type
To use a Rendering Type in a Crowd Simulation, it must be assigned to an Entity Type.
- Load the Character File in the Entity Type Node
- Select the Rendering Type(s) you want to assign in the Rendering Attributes and press +
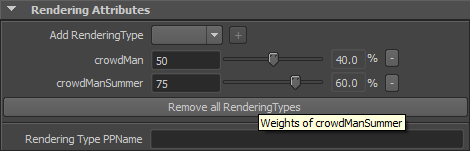
Assigning Rendering Types on an Entity Type
Rendering Type assignment and Assets repartition can be previewed with the Render Previz display mode of the Entity Type.

Characters in Render Previz
Note that if an Entity Type has no Rendering Type assigned, it will still be rendered using the default weights (they can be in the main workspace when no Rendering Type is selected).