


Making a horde of crawling insects (without UVPin)
We have seen in the first crawling insects tutorial, how to transfer insects from a plane environment to a 3D one. Since Golaem 6.3, is is also possible to generate the insects directly in place, and let them navigate in the 3D space. Here is a tutorial leading to a similar output, but using the new 'full 3D' pipe. The advantages are that there is no UV (un)wrapping issue (the insects could loop inside the box for example), and thus it is more comfortable to use. The drawback is an harder physics setup if the insects must overlap each other.
This tutorial uses the following features :
- NavigationMesh creation from the triangulated MayaMesh (no voxels)
- Population tool emitters attributes to gradually generate our insects over time. This variant uses the "OrientOnNormal" placement.
- Navigation with custom navigation sensor: so that our characters avoid only obstacles and NOT each others
- (No More UVPin)
Because the tutorial already covers several areas of Golaem, it assumes that you know how to load character, place them, make them navigate around a scene and start/stop behaviors based on triggers. If not, please read the Quickstart, Populate City Streets, Stadium Basic Workflow tutorials or watch the Golaem Workflow Overview video.
If you do not have a character to play with, we will provide ours in the Golaem Character Pack
Creating the environment
But first of all, we need to create an environment for our crawling creatures.
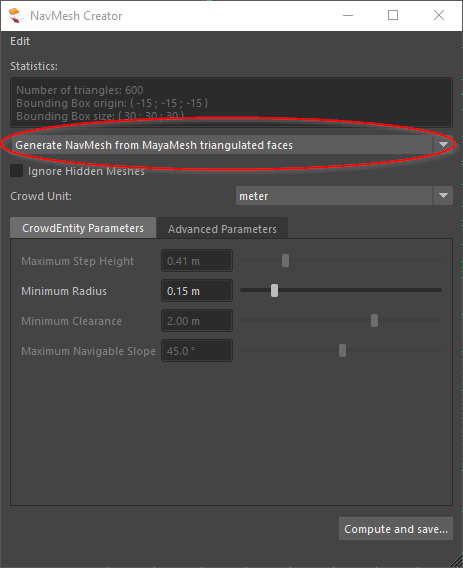
Create a big cube representing our room. There is no UV configuration involved here, as we will be using the 3D geometry directly to populate & navigate. Instead, we will ask Golaem to generate the NavMesh directly from the geometry (one triangle = one navigable cell, so the mesh should not be too defined or it will take forever to compute a Navigation Mesh). We suppressed 3 of the cube faces to have a best view of upper roof. We also reverted normals, as the faces that we are interested in are the internal ones. The cube normals will later give the up orientation of insects, thus it is mandatory. Select the cube and compute a navmesh with it so that our characters will be able to stay inside when navigating. Choose "Generate NavMesh from MayaMesh triangulated faces" in the dropdown choices.
As the normals drive the "up" vector of our entities, and also their raycast to find the ground, the normals around 90° edges should never be hard normals (per face) but smoothed ones (per vertex), in order to let the entity adapt from a face to the other smoothly. It is up to the artist to choose which distance will best fit the needed result.
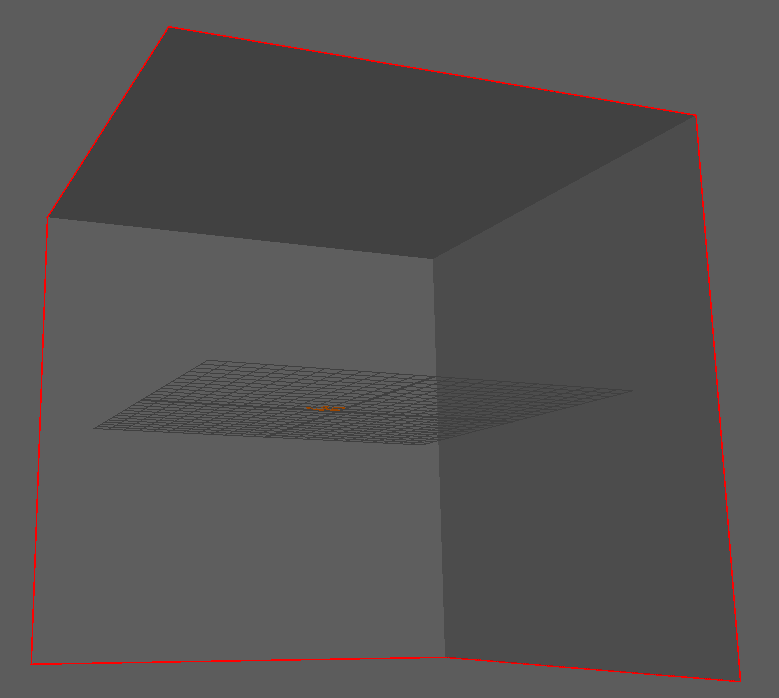
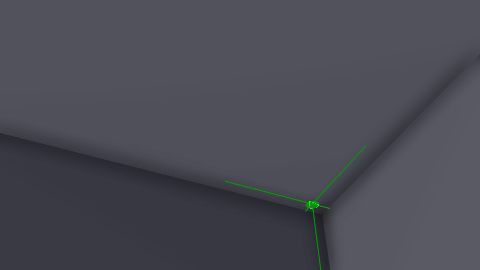
You should end up with a NavigationMesh looking like this :
Note that you may need to adjust the unit depending on the size of your cube/characters.
After the terrain is created, if needed, do not forget to also adjust the CrowdManager unit to the same unit as the one used for your terrain. You also need to check the boxes "Pin to ground" and "Orient on ground normal" to stick the arachnids to walls.
Emitting Characters
Next we are going to make our characters being generated. A simple Population Tool with the "Orient On Ground Normal" option checked, setup as an emitter, will generate the insects as expected. This is assuming the normals have been set correctly previously. You can also rotate the Population Tool to define the direction in which the slots will be projected.
Create your EntityType, and load your character file. If you use the arachnid from character pack and have a cube around 20-30 units, use a scale around 0.002 as the arachnid model is huge (200+ units unscaled). Adjust its min/max scale if needed, depending on the scale of your environment.
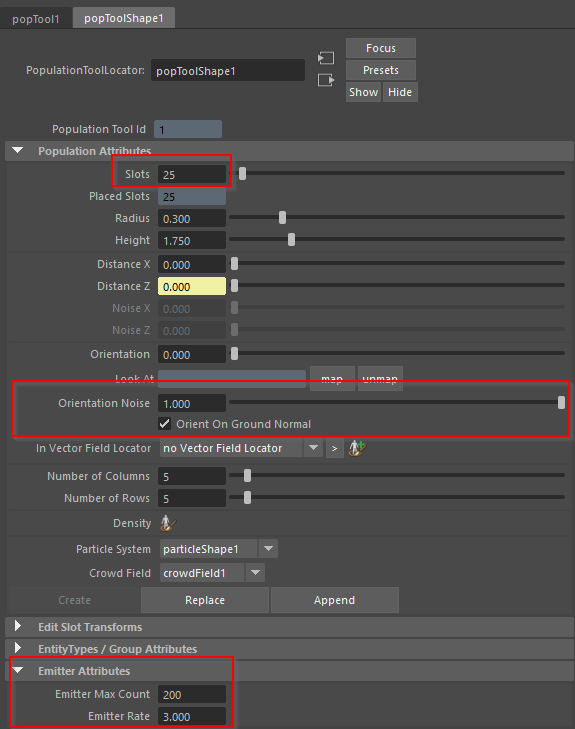
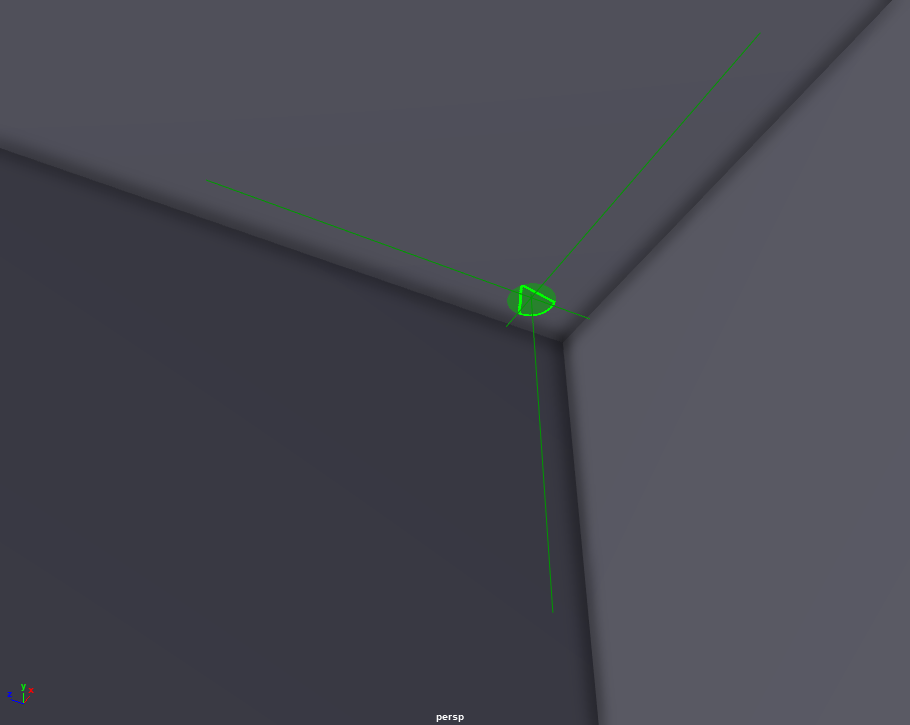
Then add a Population Tool on the upper face and adjust its radius if needed, select "Orient On Ground Normal" option. In this tutorial, we will use only one slot to give the feeling that arachnids are rushing from a wall hole. Then we need to set the Emitters attribute Emitter Max Count (maximum number of generated entities during the whole simulation) and Emitter Rate (nb of emitted characters per second)
And click create. This is very important as it will init the particle system in which entities will be generated.
If you try to play the simulation you will see that characters are randomly generated on slots, and when it is filled, the are generated on top of each others because obviously they are not moving yet.
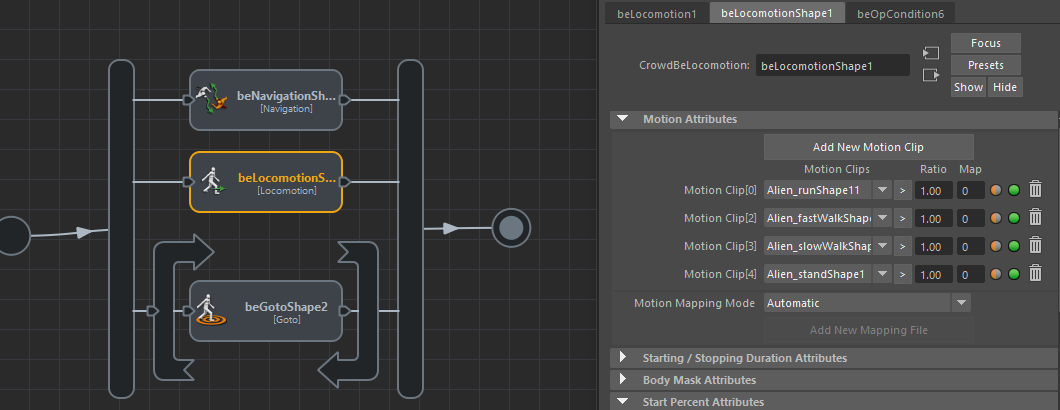
Making our characters navigate in the environment
As usual, add a Navigation Behavior and a Goto Behavior in parrallel. You will notice that we embbeded our Goto Behavior in a Loop Operator, so that the characters keep finding and reaching a random target. Otherwise they would just stop after reaching the first target they choose.
Then add a Locomotion Behavior with different motion speed and a rest motion.
Play your simulation.
Note : This tutorial does not cover character controller usage to make entities overlap. This would require adding a character controller in the behaviors, but also use a force behavior to apply a "gravity like" force depending on the face of the cube the entity is on. Moreover, it would also require adapting the ground as a rigid body but disable the character controller (or take some other options) near corners to avoid having the entities "colliding with the walls".