Large Crowd Simulations Best Practices
When dealing with large crowd simulations, there are a few things that will make your (and your lighters) life easier.
Tip and Tricks
First, here are some tips and things to keep in mind in order to fasten simulations / export / render:
- Every polygon counts! Remember that each polygon will be generated and shaded for each character!
- Every bone counts! During the simulation, every bone will be processed, computed, displayed, exported and rendered. If bones (like fingers) are not needed, do not create them in your Maya skeleton.
- To render only a fraction of the Characters, use the Draw Entity Percent attribute on the Crowd Render Proxy
- Lighten the simulation display: Golaem Crowd provides several ways to lighten the display of the simulation. Take a look at the Draw Entity Percent of the Crowd Field or at the LOD Pixels Size parameter of the Entity Type node.
Influence of memory usage on render time
In our experience the biggest factor influencing render time is the memory usage!
If you hit 90% of the memory, the operating system will start unloading some memory on the disk to free some space for the next memory allocation. This process is VERY time consuming. This is what could make a 5 minutes / frame render suddenly become a 2 hours / frame one. That is why most of the best practices below rely on avoiding allocating memory.
Rendering Only What's Viewed by the Camera (+margin)
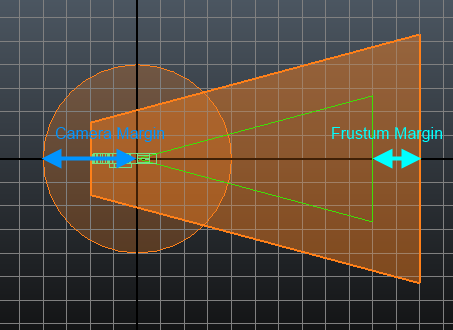
Even if the procedural rendering approach only generates Entity geometries when they're required / hit by a ray, it's not uncommon to have Entities really far from the camera getting generated due to diffuse / shadow ray bounds. Thus, in certain situations, it's possible to generate only the Entities which are close enough to the camera frustum.
To base the rendering on the camera frustum, open the Rendering Attributes of the CrowdManagerNode:

The Frustum / Camera margin attributes can be seen as the following:

Relying on automatic mesh instancing
Golaem will automatically instanciate (i.e. store only once in memory and then duplicate on the fly when needed, hence saving memory) all meshes which are skinned to only one joint (aka rigid meshes). Depending on the type of character you are dealing with, you can save a great amount of memory by taking this into account.
See Skinning Rigid Props for Instancing for more details about how to benefit from this.
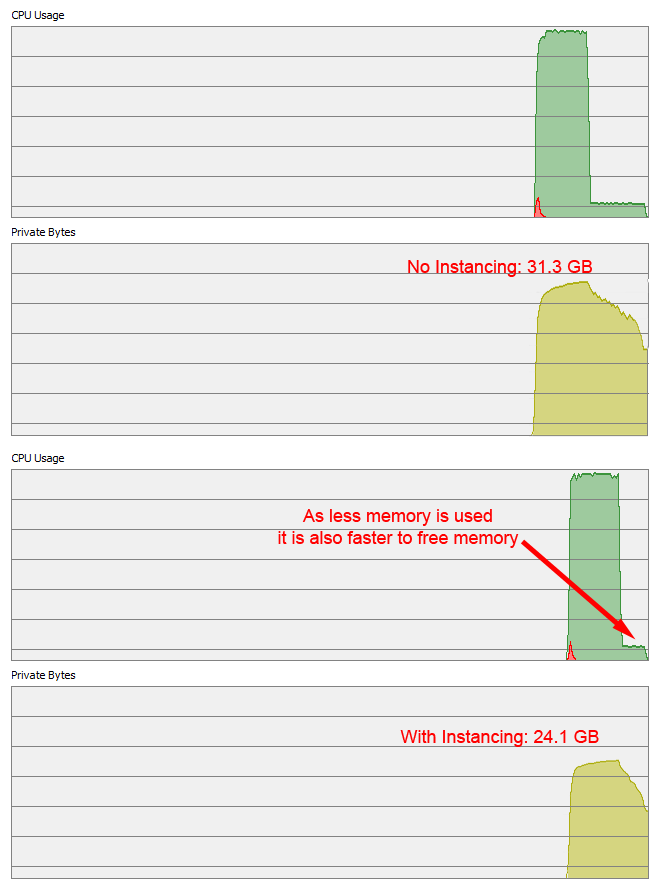
You win three times with instancing:
- because there is less allocated memory you can render more characters before hitting the memory limit and falling into the memory/disk swapping trap
- because less memory is needed, the time used to allocate memory (at frame start) is shorter
- because less memory was needed, the time to deallocate this memory (at frame end) is also shorter
Automatic Rigid Meshes Instancing is activated by default. The settings can be found in the Crowd Render Proxy.

Comparison of the rendering of 10K soldiers with or without instancing
Using LOD for the Characters
Find the tutorial here.
Splitting the simulation/render
If the above tips & tricks and best practices are not enough, you can try to split your simulation or your render in multiple parts.
Find the tutorial here
Speed Up V-Ray Memory Deallocation when render with Windows
Due to Windows low fragmentation heap and V-Ray memory allocation strategy, a significant time can be spent to release the used memory after rendering has been completed. To solve this, set the environment variable VRAY_TERMINATE_ON_FRAME_END=1 then V-Ray will write the output image and terminate the render process without attempting to free any memory manually (it will be freed by the OS automatically).
Note that when using this technique, your render farm manager could report the frame as "in error" even if they were perfectly rendered.


