Trigger Editor Controls
The Trigger Editor proposes a diversity of controls and shortcuts to manage and combine Triggers and Trigger Operators. This page lists all the classic manipulations helpful in designing and debugging a Trigger Graph.
Workspace manipulations
 |
Drag the workspace with ALT+middle-click |
 |
Zoom in/out with mouse wheel or ALT+right-click |
 |
Frame the workspace to all Triggers/Trigger Operators of the current opened Trigger Container |
 |
Frame Triggers/Trigger Operators selection of the current opened Trigger Container |
 |
Resize the workspace to the real size |
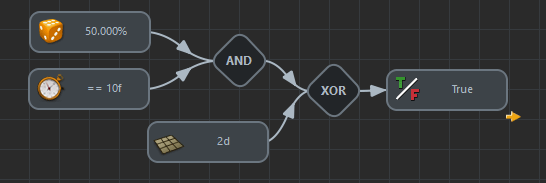
TRIGGERS/TRIGGER OPERATORS MANIPULATIONS
Select Triggers/Trigger Operators in the Trigger Graph
- Left-click on the Trigger/Trigger Operator. Use SHIFT key for multiple selection
- Drag-and-drop inside the workspace to use the rubber selection band
Add a Trigger/Trigger Operator into the Trigger Graph
- Drag-and-drop the desired Trigger/Trigger Operator from the Trigger Library into the workspace. A new Trigger/Trigger Operator will be created
- Press "TAB" key inside the workspace and use the hotbox. A new Trigger/Trigger Operator will be created
- Drag-and-drop a previously created Trigger/Trigger Operator from the Trigger Outliner inside the workspace.
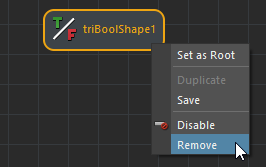
Remove a Trigger/Trigger Operator from the Trigger Graph
- Press Delete Key after selecting the Trigger/Trigger Operator in the workspace
- Use "Remove" in the context menu
Set a Trigger/Trigger Operator as Root Trigger
- Connect a Trigger/Trigger Operator after the current Root Trigger to set the new connected Trigger/Trigger Operator as Root Trigger
- On Triggers/Trigger Operators, use "Set as Root" in the context menu

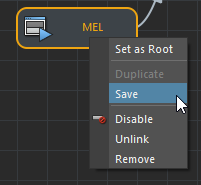
Save/Share Triggers, Trigger Operators and Trigger Containers
Triggers, Trigger Operators and Trigger Containers can be saved in a file (Maya ascii file) as a Custom Trigger and then reused in another simulation or shared between users.
Notice that in order to work fine inside a complete different scene than the one where the master Trigger was saved, all meshes and objects mapped to saved Triggers are also saved (for example the zone trigger mesh of a Polygon Zone Trigger).
Save Triggers/Trigger Operators and Trigger Containers
- Use "Save" in the context menu
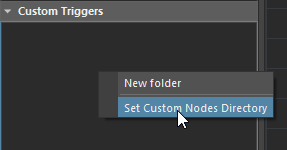
The new Custom Trigger is saved in a Custom Trigger Directory. This directory can be changed in the Crowd Settings or by choosing "Set Custom Directory" in the contextual menu of the Custom Triggers Library.
Open a Custom Trigger
- Drag-and-drop a Custom Trigger from the Custom Triggers Library into the workspace, if the Custom Trigger is a Container double-click to open it in a new tab.
The Custom Trigger is automatically loaded and ready to be linked and simulated.
Share Custom Triggers between users
A Custom Trigger can easily be shared with another user by simply providing him the file in which Custom Trigger has been saved (see Crowd Settings to locate the Custom Trigger directory). There are then several ways for this user to import Custom Trigger:
- Either by directly putting the file in its own Custom Directory. The Custom Trigger is then automatically available in the Custom Trigger Library.
-
Or by creating a copy of the Custom Trigger by opening the file in Maya and re-saving it as a Custom Trigger through the Trigger Editor:
- Start Maya and load the Golaem Crowd plugin;
- Open the Custom Trigger file;
- Open the Behavior Editor;
- Open the Trigger Editor
- In Trigger Editor Scene Triggers, drag-and-drop the Trigger in the Trigger Editor workspace;
- In Trigger Editor Main workspace, right-click on the drag-and-dropped Trigger and "Save", as previously described.
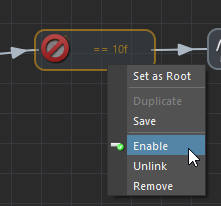
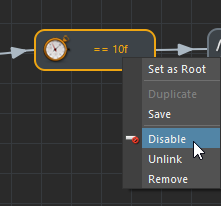
Enable/Disable Triggers
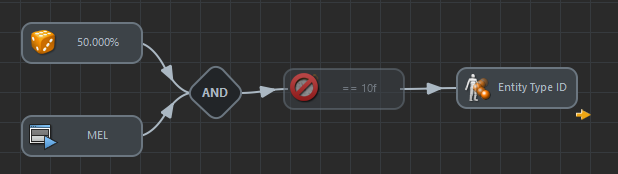
Triggers can be disabled inside the Trigger Graph to help designing and debugging complex actions without modifying the Trigger Graph. The disabled Trigger is overlaid with a disabled icon  .
.
A disabled Trigger is not evaluated during simulation, the next Trigger marked as enabled will be played.
Enable Triggers
- On disabled Triggers, Click on the Trigger icon to switch the enable/disable status
-
Use the enable button
 to enable selected Triggers
 - On disabled Triggers, use "Enable" in the context menu
Disable Triggers
- On enabled Triggers, Click on the Trigger icon to switch the enable/disable status
-
Use the disable button
 to disable selected Triggers
 - On enabled Triggers, use "Disable" in the context menu
Triggers/Trigger OPERATORS Sequence MANIPULATIONS
Link Triggers/Trigger Operators
-
Use the link button
 to draw a link between Triggers/Trigger Operators
 - Drag the mouse while holding the mouse middle-button in order to draw a link between Triggers/Trigger Operators
- Drag-and-drop a Triggers/Trigger Operator to insert it in the middle of an existing link
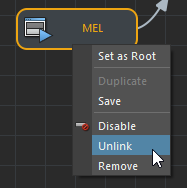
Unlink Triggers/Trigger Operators
- Drag-and-drop with ALT+mouse-left desired Triggers/Trigger Operators out of the link
-
Use ALT+mouse-left and drag to draw a razor
 . Release to cut links
 - Use "Unlink" in the Trigger/Trigger Operator context menu