


How to import shaders in my rendering scene?
If you did not import shaders for your characters when creating your EntityType, you can still import them afterwards.
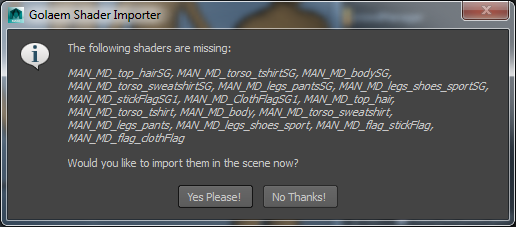
Use the Import Shaders button  . Golaem will analyze the scene and based on the Character File used, will display which shaders are missing and propose to import them. Click Yes Please!
Browse to the shaders file corresponding to your renderer (e.g. /golaem/shaders/CMO-man_golaemLight_AR.ma for Arnold).
The Shader Importer Tool will import this file in the scene and strip it from its namespaces, in order to make the shaders' names to match with their name in the Character File.
Do not hide the source model which has been imported at the center of your scene. It needs to be active for the linked shaders to be found by your renderer. You can move it outside the camera view, or change the render stats on its meshes (in the Golaem Character Pack, primary visibility & co are already set to off ), but it must not be hidden.
Note: If you do not like the Shader Import Tool doing things behind your back, you can of course import your shaders manually using the Maya/File Import command, but just make sure that the shaders/shading groups names are exactly the same as in the Character File, namespaces included. If needed use the Maya file editor or Maya/File Import options to remove unwanted namespaces.
After loading the shaders, if you already played your simulation once, they may still not be refreshed and you may still see oranges characters.
In this case, select the Entity Type and go to the Display Attributes, open the Render Previz Panel and hit the Refresh icon, then rewind and hit play to get see your characters correctly displayed.
